

As Lightroom is too slow to import 1000’s of Bird in Flight images – I use FastRawViewer(FRV) to preview the images right from the card prior to import.
Only images flagged (by using Stars or colours) in FRV and then selected in FRV are imported. FRV flags are imported into LR along with the images as per normal.
Insert Card – right click image and Open FastRawViewer. Preview potential images for input into LR then flag them using ‘1’ for one star.
At the end of the flagging process, select all of the flagged images: Command+’ and choose the flags used such as ‘1’.
Useful shortcuts are also:
- H – Highlight inspection tool
- D – Details Focus Mask
Press 1-5 6,7,8,9 or 0 for none
Finally = select all the rated images by rating label Cmd+’ and choose ‘1’s etc. Only those selected will be imported by LR.
If there are not too many shots on the card: Run Program LR (Option R) – Lightroom will display all images but only those selected by FRV will be check marked. Select LR destination then import.
If there are a lot of shots on the card: Shift + C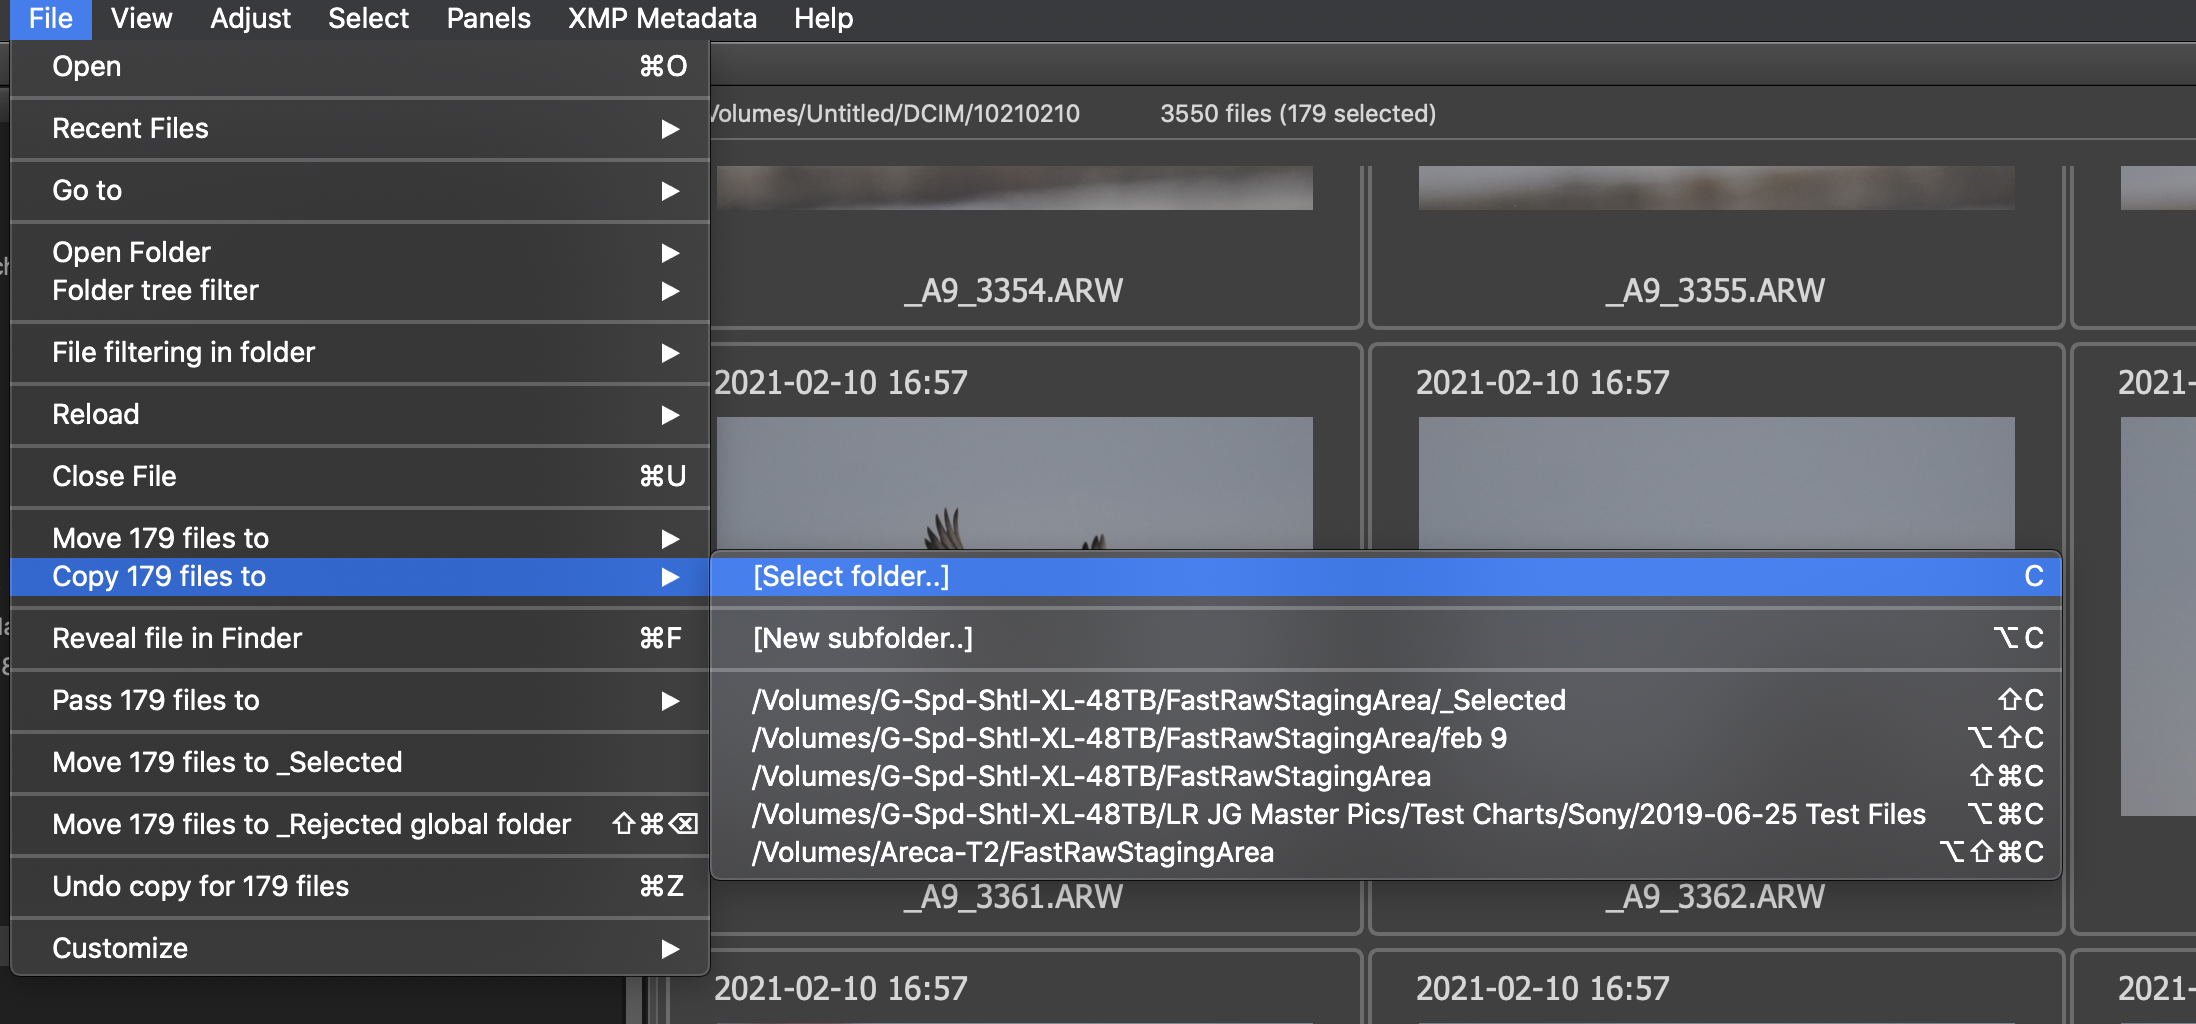
Sony A9II AF setup test video – Take 3
The following video demonstrates what AF tracking is like. Settings are recorded in the beginning of the video. Green boxes indicate use of Zone with Red marker indicating actual focus point. Red only indicates use of Flexible spot expand only. The duration of the owl flight was 18 seconds, thus my tracking ability was tested beyond the limits. Better keep practicing.
Video: Owl 2021-02-09
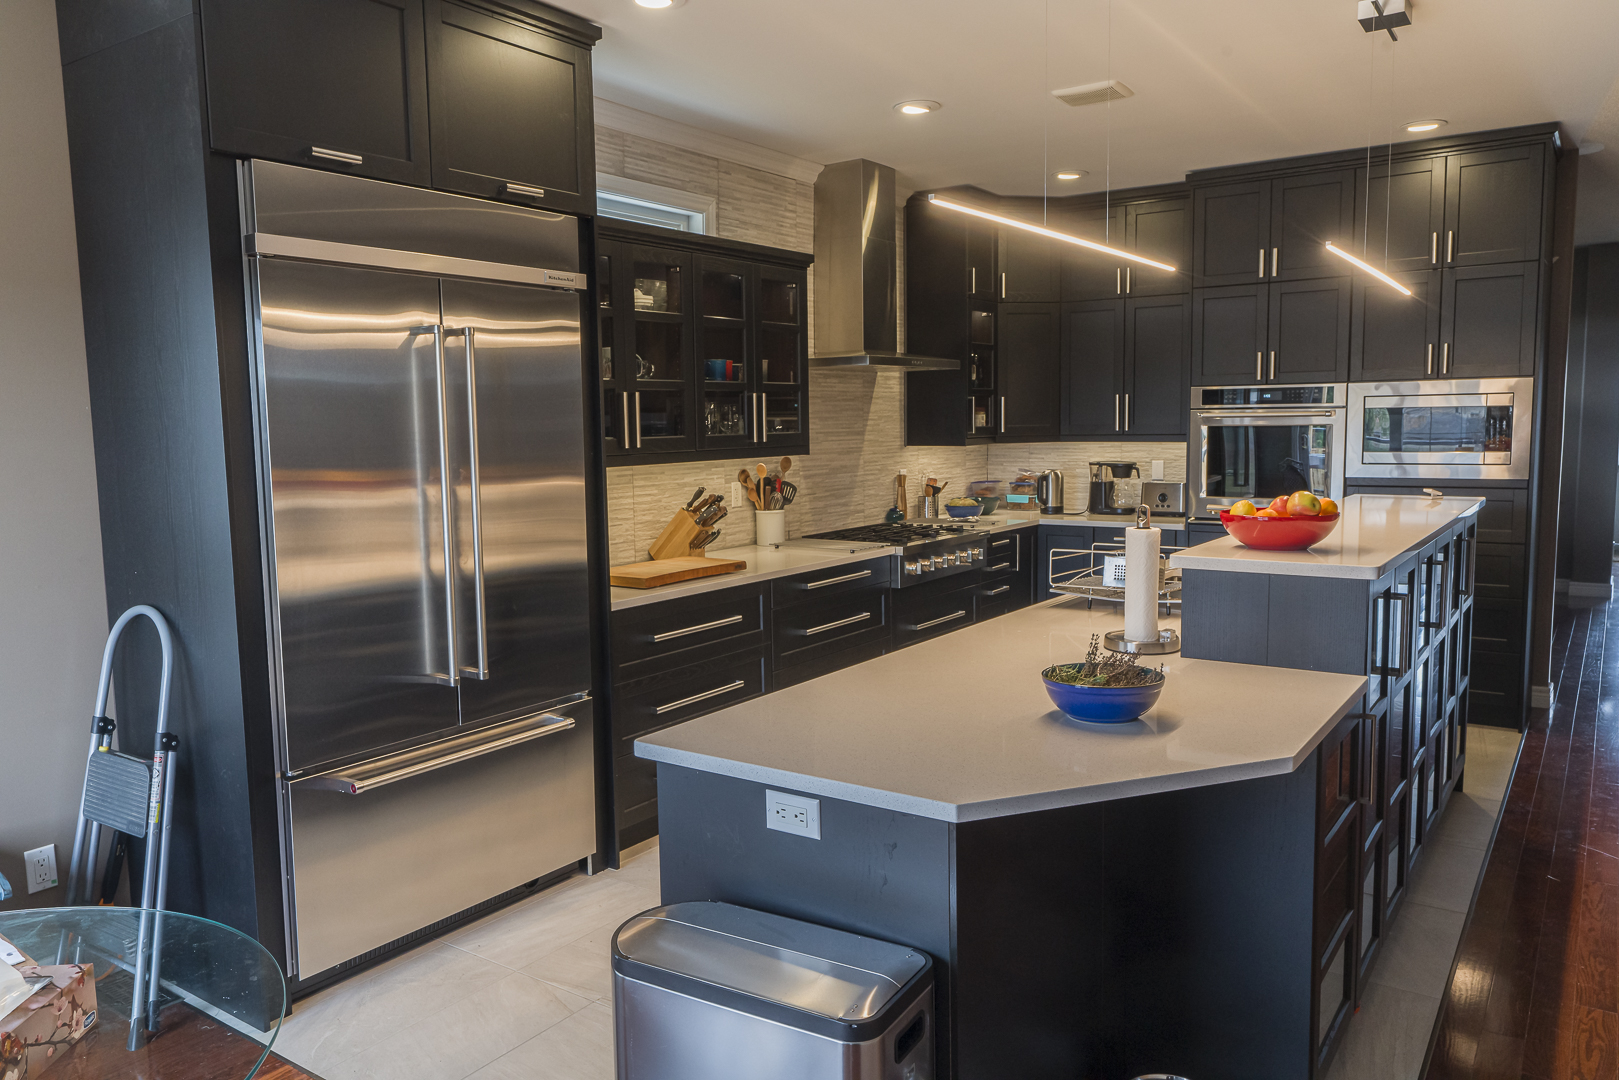
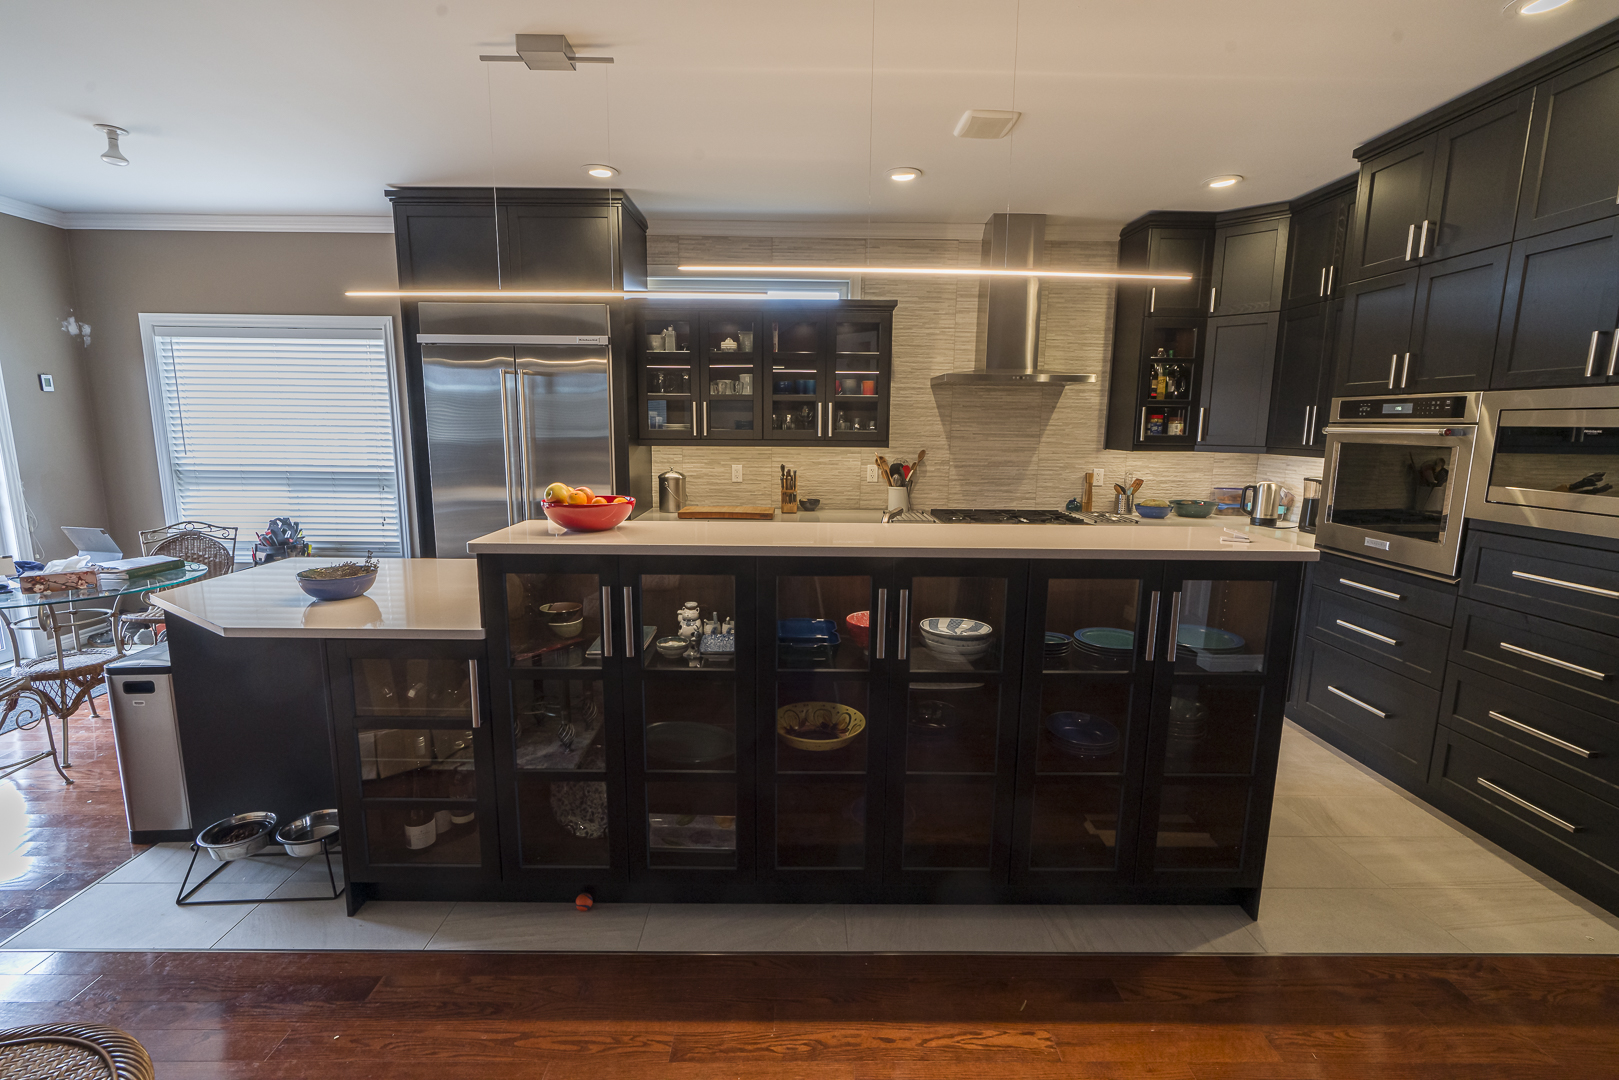
After working on the kitchen reno for almost four months I finally got around to posting a few pictures taken Dec 22 2020. The last image is the “before”. 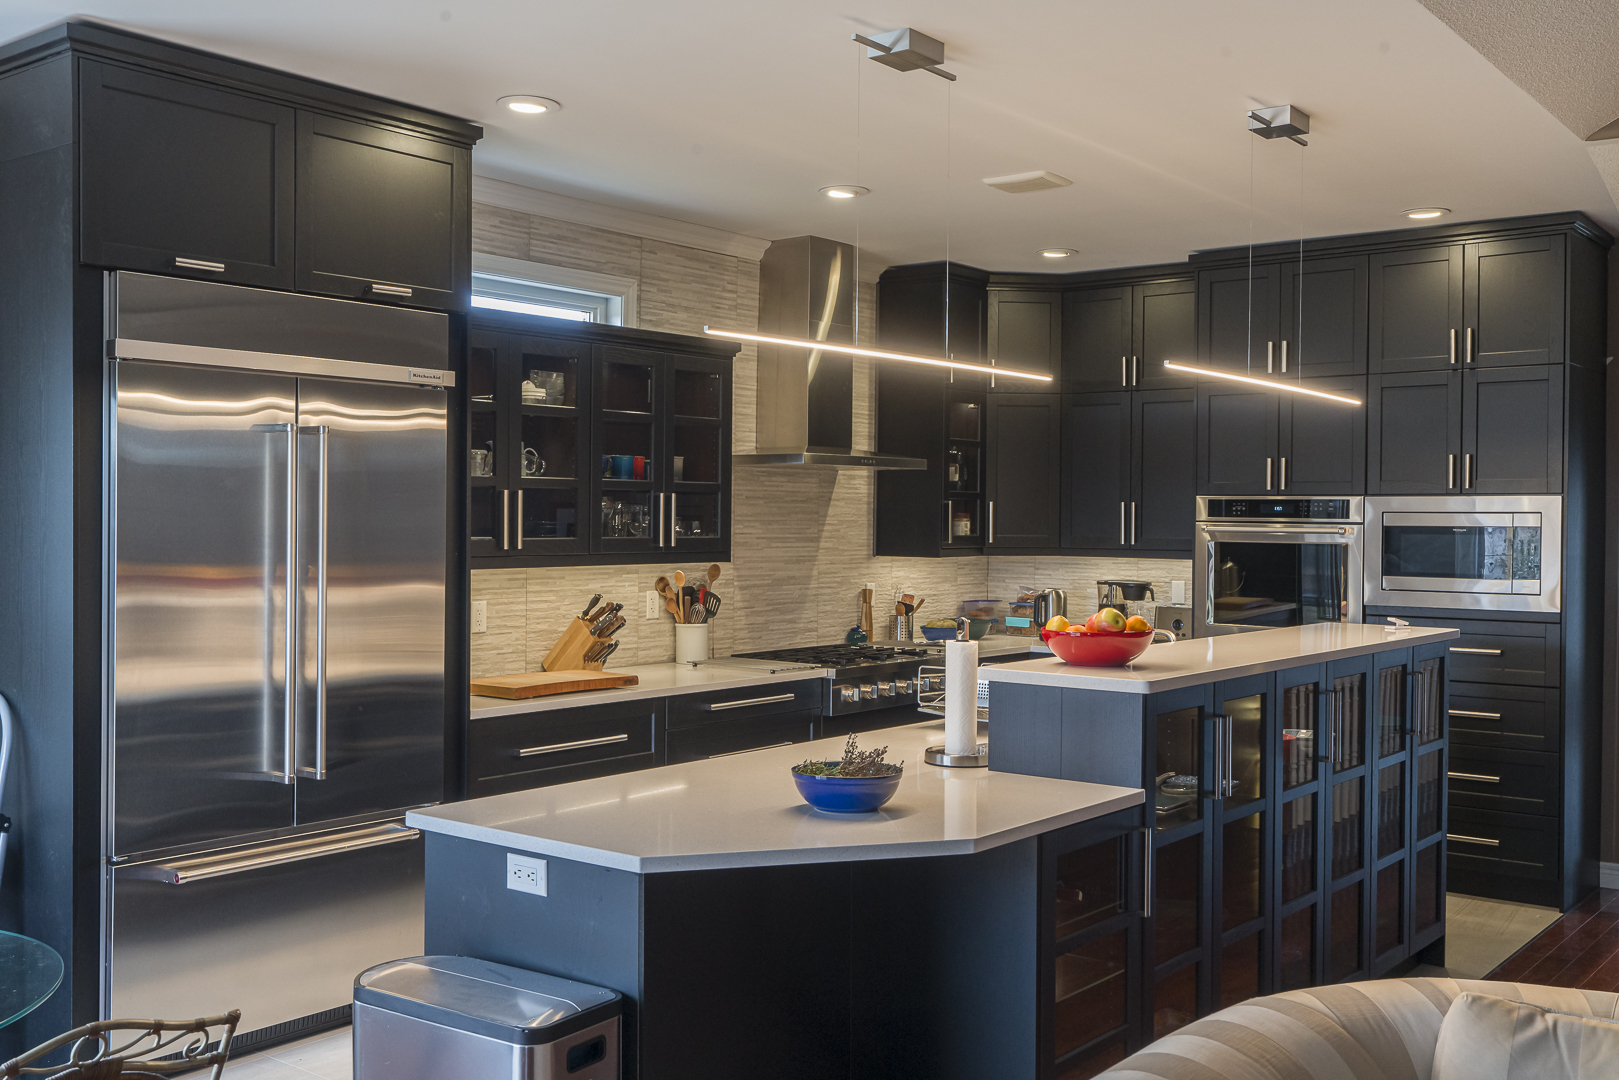

Lightroom Classic- Apply Develop Adjustments automatically at Import (last updated Sept 4, 2022)
Having Lightroom Classic apply standard develop presets is an enormous time saver. For those that would prefer not to apply develop adjustments to each image, or if your like me and prefer the final cull to have adjustments applied before making a final selection applying a develop preset at import time is a great time saver.
Lightroom CC can automatically set standard (default) adjustments (basic tone, colour, texture, sharpening etc.) for each camera and apply customized noise reduction based on the ISO of each shot. Typically only noise reduction is adjusted by ISO but Adobe allows any setting to be included.
This really cuts down on time and effort in post processing. I find that ‘triaging’ shots that are processed in this manner much easier and faster- especially when comparing thousands of similar wildlife shots a day.
Its also worth noting that sharpening and noise reduction are really based on the sensor – in theory sharpening and noise adjustments are the same for each shot from the same camera body with adjustments for specific ISO. This assumes that you are following best practice sharpening processes, first sharpening at import, tweaking the sharpening for a few ‘best’ images (artistic sharpening) then applying specific output sharpening at print or web output time.
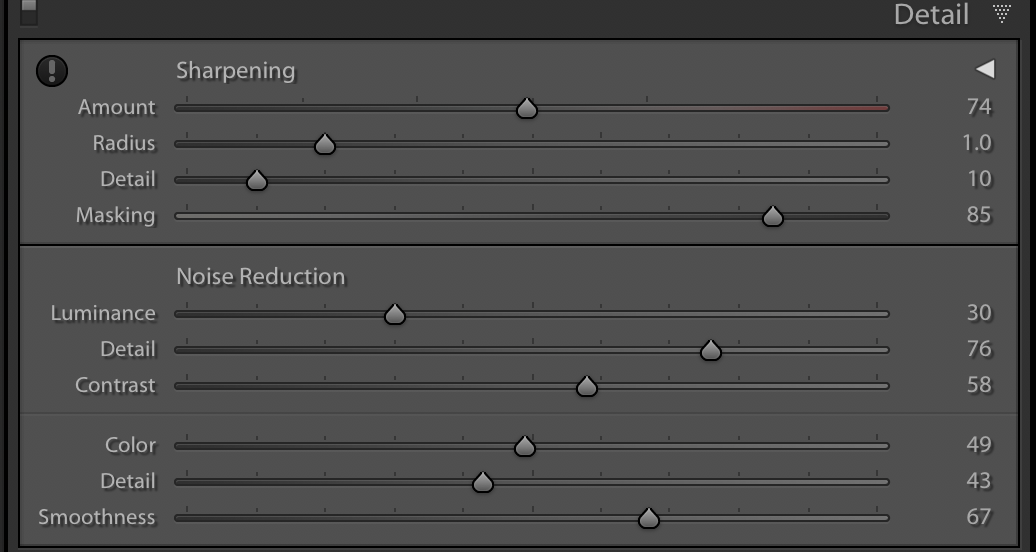
For example: for an image shot on a Sony A7 RIII at ISO 100 I use :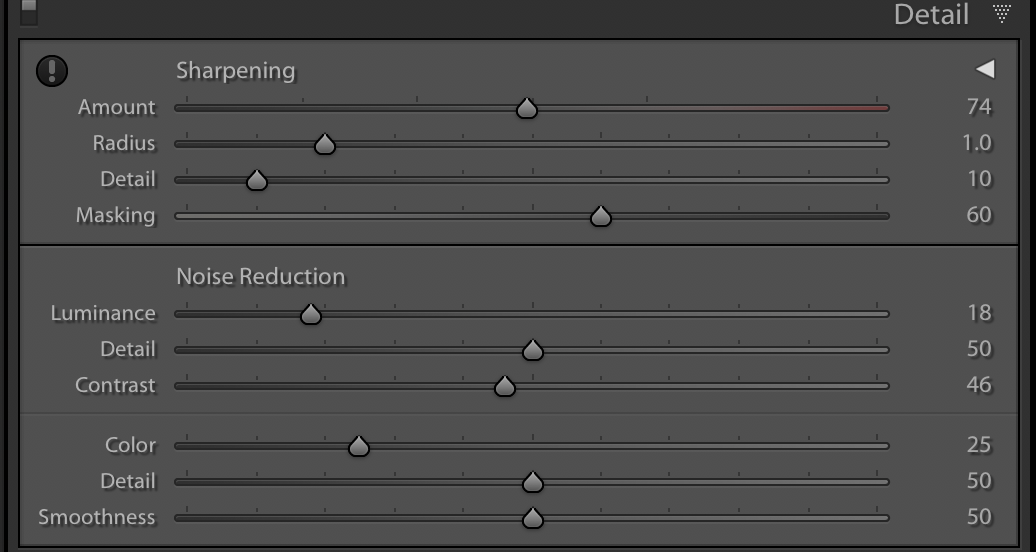
While at ISO 6400 I use the following – with stronger masking for sharpening and higher noise reduction (all quite dependent on the camera sensor so don’t copy my settings).
To have Lightroom apply intermediate levels to each ISO perform the following two step process.
Step 1
First select two images with a range of ISO’s. I used one shot at ISO 100 and another at 6400 as this is covers most of the standard ISO settings I use when shooting. These two shots would typically have identical import settings except for Noise Reduction which varies by ISO.
Now create an Adaptive ISO Preset which will alter the noise reduction/sharpening so that it is incremented equally across the ISO range you selected ( in my example 100, 125, 160 … 6400):
– In the Develop Module, go to the preset panel on the left and hit the + to create a new preset
– With the two images selected (100 & 6400) select the settings that would be typically included in any import preset as per the example below.
– Make sure to select “Create ISO adaptive preset” at the bottom of the preset window
– Save the Preset with a name that identifies the camera and ISO range.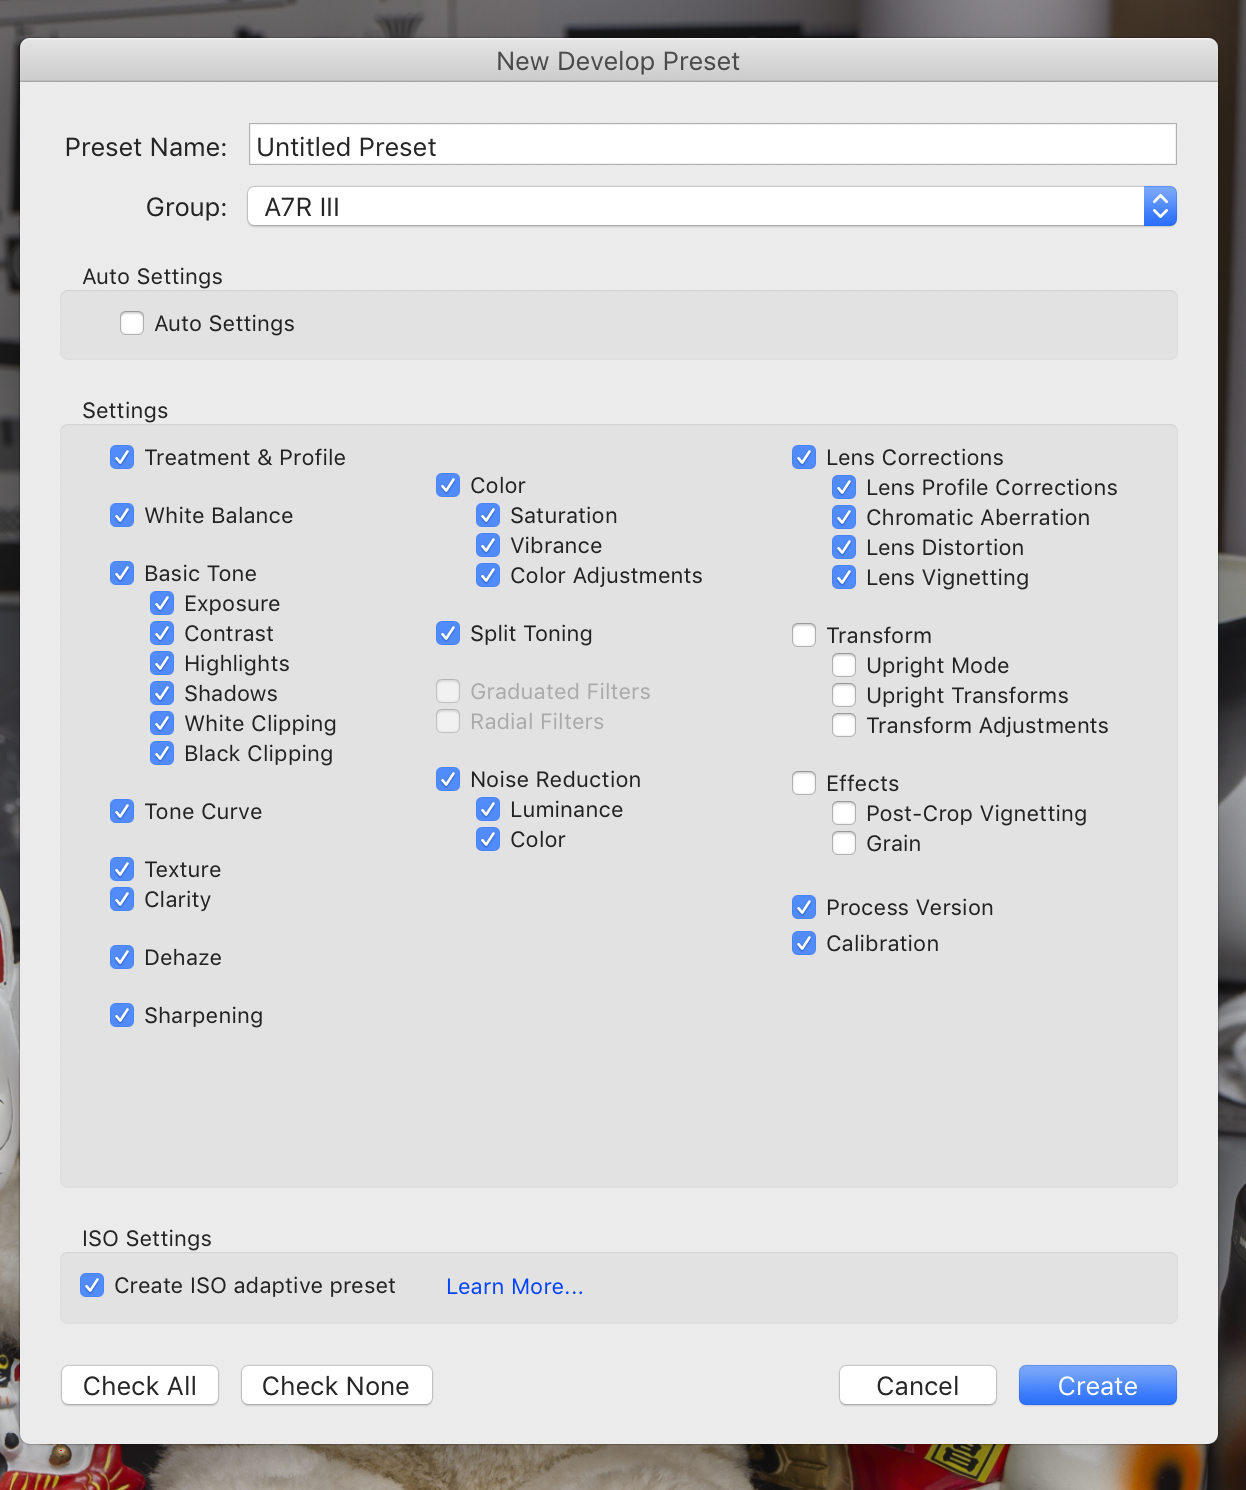
Step 2
Now set Lightroom CC so that it uses that new preset at import time:
Within Preferences>Presets Tab:set the following:
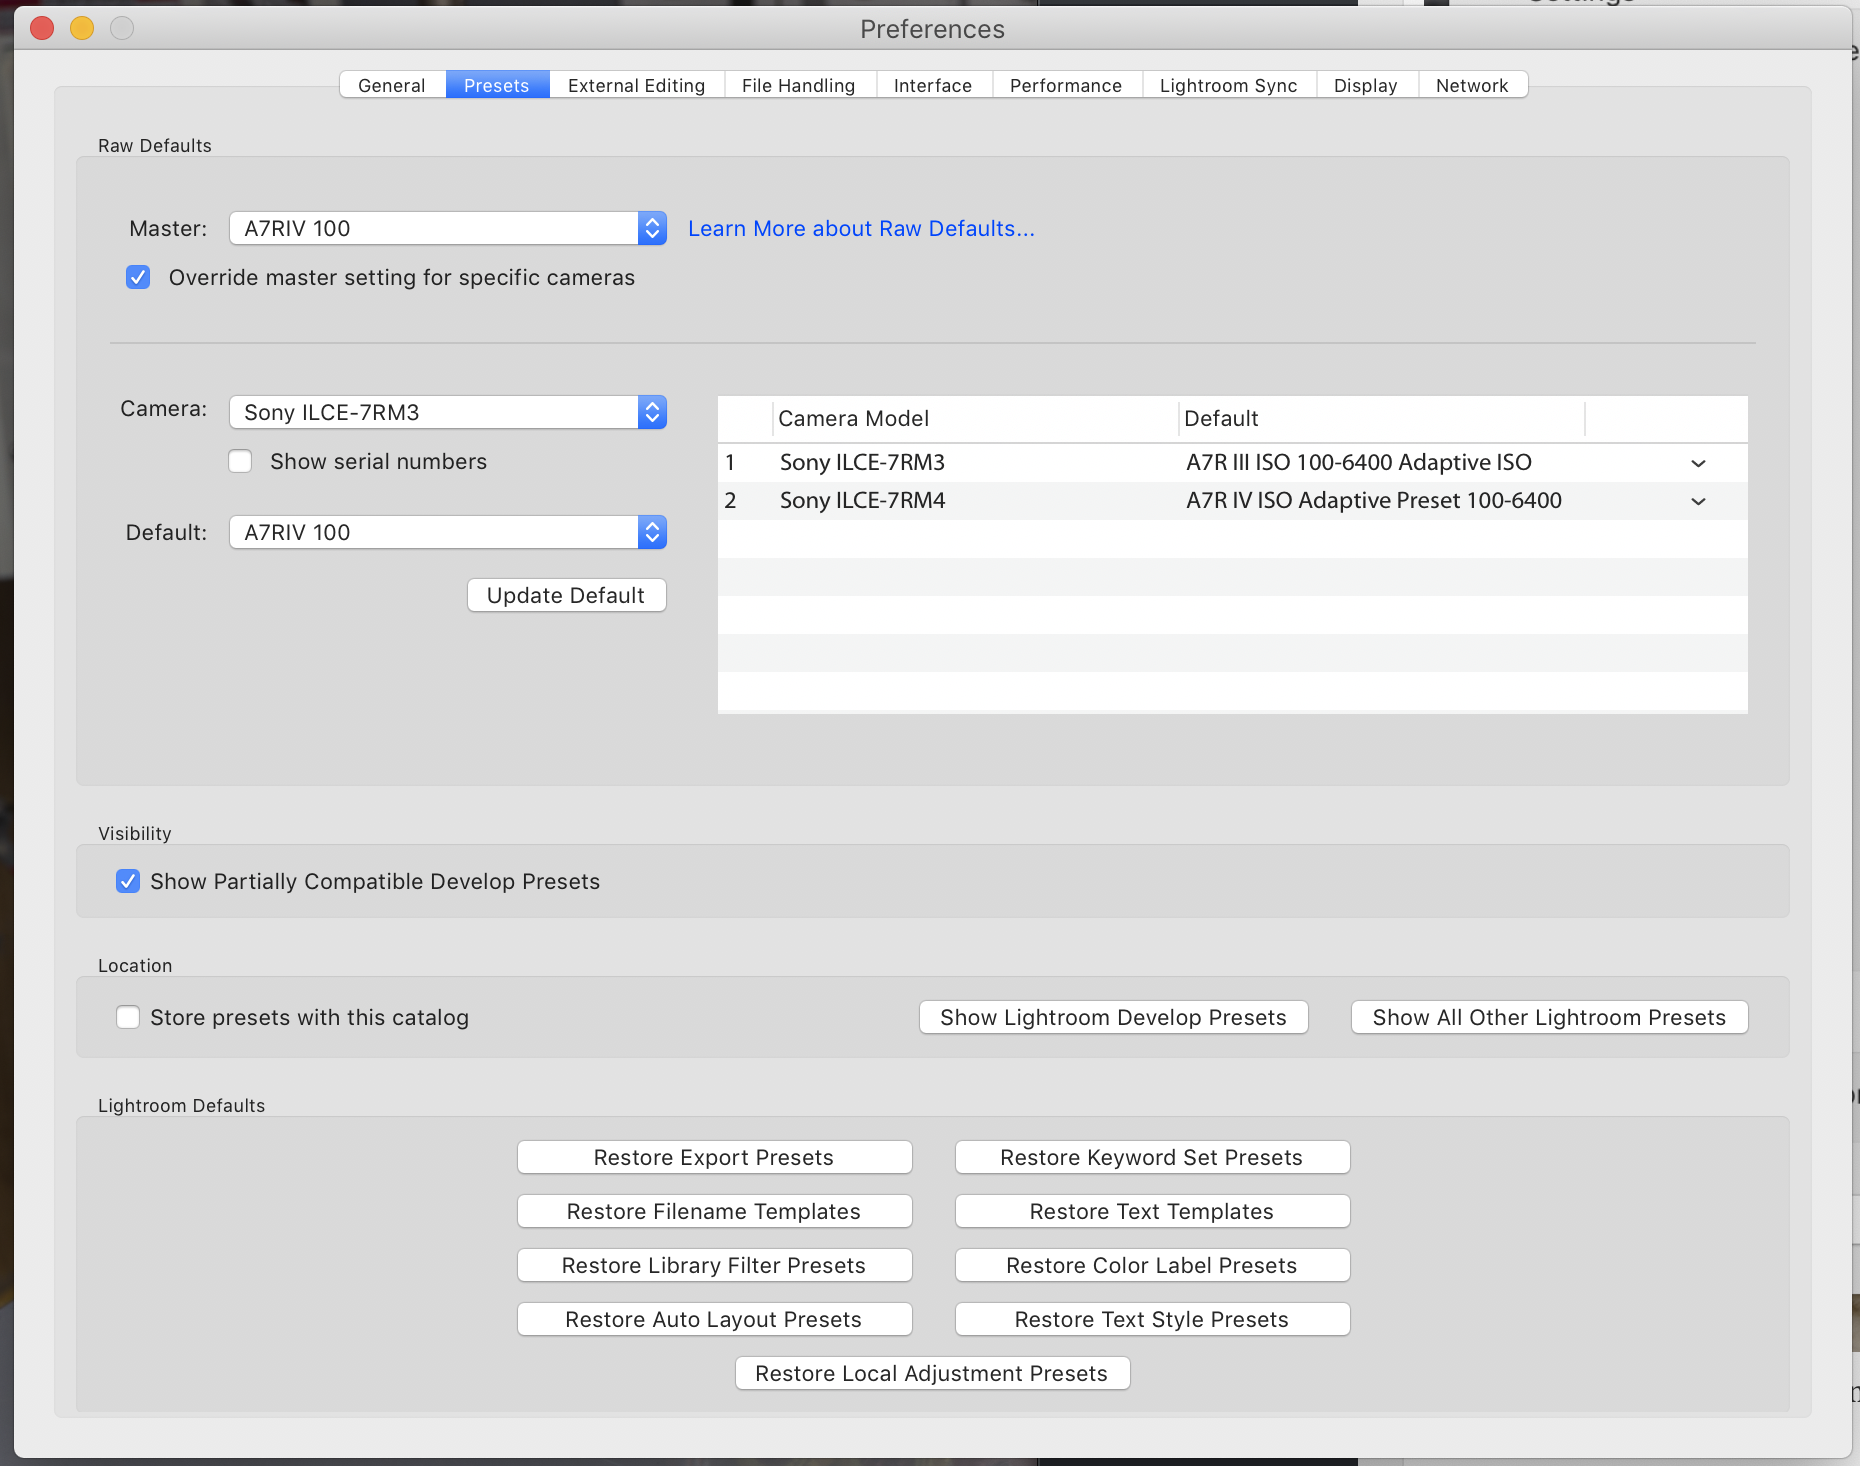
Master: This is your default for any setting that is not subsequently defined in other subsequent presets. You therefore could set most of the desired settings in Master and then just override noise settings by Camera and ISO.
Override master setting for specific cameras must be selected.
Then select the Camera and click the Update Default which will then add the camera model to the right hand box.
From this right hand box select the preset created from step 1.
Do this for each camera.
At the end of the process, the window with Camera Model and Default should display the Adaptive Preset for all cameras you have set.
June 21 2019
March 2019 I decided to give up on the Epson 7900 as the print head once again was clogged beyond any method of cleaning it including manual methods with windex etc. As this was its 3rd time it needed a new head at $3000 I decided to just give up on it.
I selected the Canon P-1000 because of its print resolution, wide range of ink gamut (colours) and that the printer seems to flush its heads better, hopefully keeping the head working.
After installing the ink into the a new P-1000 on March 20 2019, it flushed quite a lot of ink into the machine to charge it for the first time. I then used Qimage One to send a 8.5 x 11 Unclog pattern to the printer every day. I assume that the initial flush may have put ink into the Maintenance (tank) Cartridge MC-20 but I have no measurements of that.
I printed about 100 pages over the next 3 months – generally 8 x 10 printer proofs and some 11×17 final prints.
On June 21 2019 I performed a print head nozzle print head pattern (which was perfect as always) and the printer requested I change the Ink Maintenance Cartridge MC-20. So far I have not had a nozzle check problem at all and have never cleaned the nozzle manually. I believe the Qimage One is causing the printer to do keep the heads in good shape.
After the printer requested a new Mc-20 I weighted the it at 280 grams empty and the old tank at 555 grams full. This means there was 275 ml of ink in the maintenance cartridge or 3.4 ink tank cartridges over a period of 92 days. Thats 2.99 ml per day. In Canada, each cartridge costs $81.36 CAD (Including tax) therefore to keep the printer going costs about $244 for 3 months or $976 per year. I do buy the ink in bulk at a slightly cheaper price but still – WOW!
I use only OEM inks and maintenance cartridge.
I do acknowledge that the initial loading of the ink is a one time event that may have made the situation much worse. We will see how the next tank goes and so far I have not replaced any inks.
I will update this post with any results I have from the next MC-20 change.
SD Cards speeds measured using Blackmagicdesigns disk speed test using the iMac Pro SDXC UHS‑II card slot conveniently located on the back of the monitor:
- Lexar 128GB U3 2000x 300MB/s SD card II has a write speed of 175.2 MB/s and read speed of 254.1 MB/s.
- Sony 128GB SDXC UHS-II has a write speed of 182.4 MB/s and read speed of 256.5 MB/s.
- 64GB SanDisk Extreme I U3 – W:55.4 R:43.3
When using thePro Grade USB-C card the speed drops
- Lexar 128GB U3 2000x 300MB/s SD card II W:39.7 and R:43.2 – no idea why its so slow
- 64GB SanDisk Extreme I U3 – W:38.9 R:43.3
When directly connecting the Sony A7RII via USB-C – Mass Storage Mode
- Lexar 128GB U3 2000x 300MB/s SD card II:11.7 R:31.8
- 64GB SanDisk Extreme I U3 – W:9.9 R:31.9
The A7RIII does not natively tether within LR so the Sony Remote App must be running. Shut down Dropbox as the Remote app does not work with it.
Place the files in the Auto Import Directory of LR and import that way.
The remote app has a link from the Viewer App which is in my App Alis folder.
Sonys menu settings can be daunting for a new user. One thing I have set up is a index of all the settings and where you can find them in the menus.
Sony A7RIII Settings Sorted Alphabetically – you can download them from here:
Mac Pages Format: Sony A7RIII Alphabetical Settings Rev 1
Version 2 of the above – work in progress: Sony A7RIII Alphabetical Settings Rev 2
PDF Format: Sony A7RIII Alphabetical Settings Rev 1
Excel Format: Sony A7RIII Alphabetical Settings Rev 1
Here for the record is my starting point – I will periodically update the chart.
PDF of recommended A7RIII settings from Mark Galer. 3.01 Firmware: Sony A7RIII Camera Settings
If you have any comments please let me know by emailing me.
May 2019 marks the beginning of a new milestone for me. Although good photography is largely about the skills of the photographer however there are a few other issues that need to be considered:
- Resale value of existing equipment – selling it before its worthless
- Ability to carry heavy DSLRs and space for travel
- New Features – focus peeking, zebras, dynamic range, and overall image quality
I feel Canon has not kept up with Sony and Nikon is not even in the running for me. I was unimpressed with my 5DSR in low light and my 5d IV lacks image sharpness due to lower MP and strong anti alias filters. I use both of these cameras for Landscape / Portrait / “non action” – and so for that type of work I have switched to Sony A7RIII.
I was planning to wait for the A7 IV but Sony is really pushing the market with deep discounts of about 30% off list. This likely will therefore be a learning and backup body some day within about a year. Thats OK.
On a recent trip in Florida I was still very impressed “action” 1DX II – keeper rate of incredible 95% for birds in flight, well beyond my friends Z7. So for action photography the Canon 1DX, 500F4, 100-400 stays for now. Time will tell. I am also planning to cut down on birding trips for a while and try the A7RIII with some birds on stick work.
So it’s going to be a long journey – with a very slow transition from Canon as equipment is sold off. Lots of great stuff available if anyones interested which I will post over time.
Right now the Sony menu layout generally gets poor reviews – but I am still on the fence – their approach is just very new and thus different. If anyone wants a settings reference spreadsheet in XLS format (I did not develop it). https://1drv.ms/x/s!AiCfwkPyFRx_gQJ22fIQ8Y5XX_VO?fbclid=IwAR3YHLDsjzGZdRAfJ1zIETdjVOdUCrYjyDPpINaL4qop08_e9QZ4reUllgo
Suggested settings by the guru’s Tony Northrup and Mark Galer have been noted within the file. The real issue is how to put it all together to make a functional camera in the field.
As of May 2019 I use FastRawViewer to cull my images prior to importing them into Lightroom. I do this because Adobe is unable to provide consistent performance within Lightroom. Workflow as follows:
- Insert Card or attach Camera – FastRawViewer will start
- the following instructions are all within FastRawViewer
- Shift C to copy the card to FastRawViewerStaging area which is a folder I set up and made a favourite
- Star or Rate each image as desired. Images without a star or rating will subsequently be ignored.
- Command+’ to select images by star or rating
- On one of the stared images, right click and select “Run Program” > Lightroom. (I set up that program in preferences)
- Lightroom will open – with just the stared or rated files visible. Set the destination folder.
The remaining work is performed in LR or PS.
I am documenting my standard workflow so that problems related to issues with the contents of Smart Objects (SO) can be resolved without me re-inventing the wheel each time I have a problem:
- Lightroom Edits should include all toning – taking full advantage of the tonal range, have minimal noise reduction and include fully adjusted Camera Raw CR sharpening with an adjusted Sharpening Mask on an image by image basis. A LR import preset does most of this for me
- Noise reduction in LR is minimal since that will be better handled by NeatImage within Photoshop(PS)
- PS is then used to clone, crop/resize and apply targeted sharpening and noise reduction
- Lightroom then handles any output resizing, output sharpening and file conversion
- Using this approach This results in 3 passes of sharpening: Camera Raw, PS Artistic, Output. Noise reduction is largely performed by PS with different noise reduction levels for the subject and background (where the subject is significantly different from the background). For landscapes where the subject is largely spread over the entire image there is just detail sharpening as required (not the sky or water)
- Don’t crop in LR prior to going into PS, it’s too hard to change in PS at subsequent steps as masks are not easily adjusted in PS if the crop size changes
- Open the LR image in PS as a Smart Object. In the example below its the bottom layer with some further adjustments on top that were to awkward in LR. In particular I use PS for cloning
- Create a SO containing all “rendered pixels layers” – clones etc. This Pixel SO is the basis for Noise Reduction and Sharpening. Generally colour balance is performed here as the next steps do not deal with the global image
- From the Pixels SO, A single SO with Noise reduction must contain the Pixel SO as the base layer, then Noise reduction on top of that. Therefore the Noise Reduction SO would contain 3 layers at a minimum:

1) Subject (the Pixels SO plus a mask of the subject) with specific edge detail Noise Reduction. Detail enhancement is optionally performed using NIK at this stage.
2) Background (the Pixels SO plus a mask of the background). Heavy duty noise reduction – basically a blurring of the background.
3) There could be pixels missing from the background and subject, therefore remaining Rendered Pixels not covered by the 2 noise reduction layers above (those pixels not masked by the Noise Reduction) is included in this Noise Reduction SO. In theory this should not be required, but in practice it is. The Rendered Pixels SO exists within the Noise Reduction SO to fill in any gaps in the Subject/Background masks that reside on top of the Pixels Layer. The Pixels layer is mandatory in the Noise Reduction SO – leaving it out of the Noise Reduction SO will cause inconsistencies if the Pixel SO contents are changed in the future. This seems to be caused by some PS bug). - The SO labeled Noise Reduction is duplicated to create the Sharpening Layers. The Noise Reduction SO also is the source for any sharpening edge masks
- Below is the final layer stack for the Image. Local Adjustments are made on top of Global and for images to be output for sRGB, a Levels Adjustment adds image compression of tonal ranges 5-250 to allow for compressed output from Prophoto to sRGB without blowing the highlights or blacks.
- The layer mask for the sharpening layer consist of an Edge Mask.
- As mentioned the final layer Noise Reduction contains the noise reduction and adjusted pixels content.
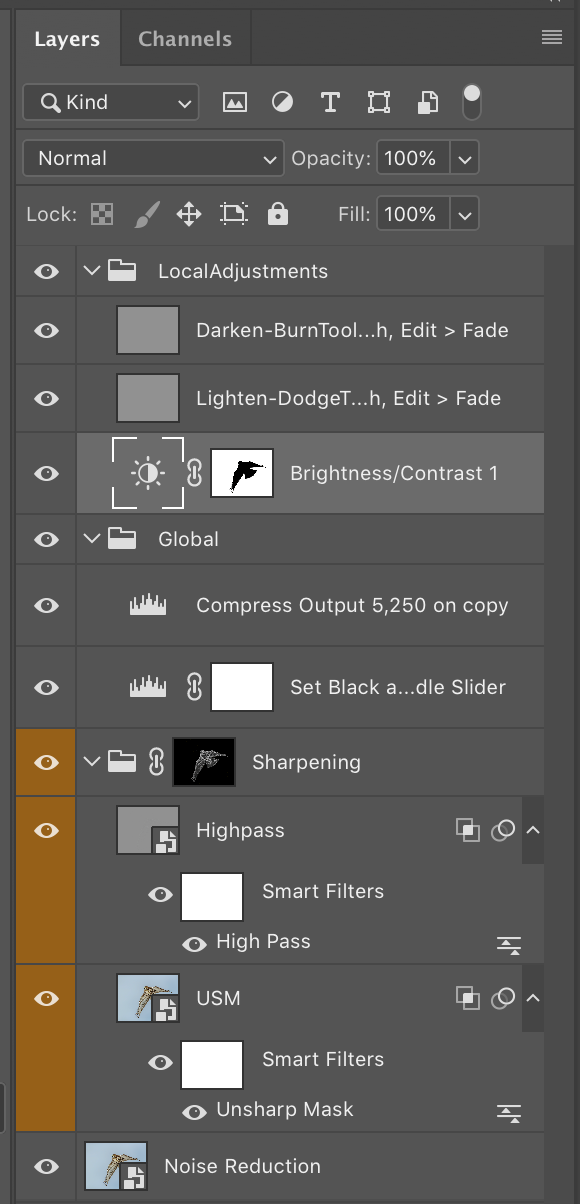
- Using LR: Output processing is then performed on the layered TIFF file including resizing, printing and output sharpening.