

To power off the Ubiquiti Unifi Dream Machine Special Edition (DMSE) use the front panel:
Settings > Device Control > Shutdown
Restart is another option
Note – use computer not mobile, IOS is resampling and seems to fix image problem.
For some reason the TV would flicker periodically as if unable to resynchronize to different video signals. This would happen at the end of a Netflix movie.
After months of fiddling it turned out that a setting required for Dolby Vision got turned off perhaps during a firmware upgrade (who knows how).
The setting is required to make the Sony and Apple TV work is on the Sony the following setting must be set:
Settings : Watching TV > external inputs > HDMI signal format > Enhanced Format
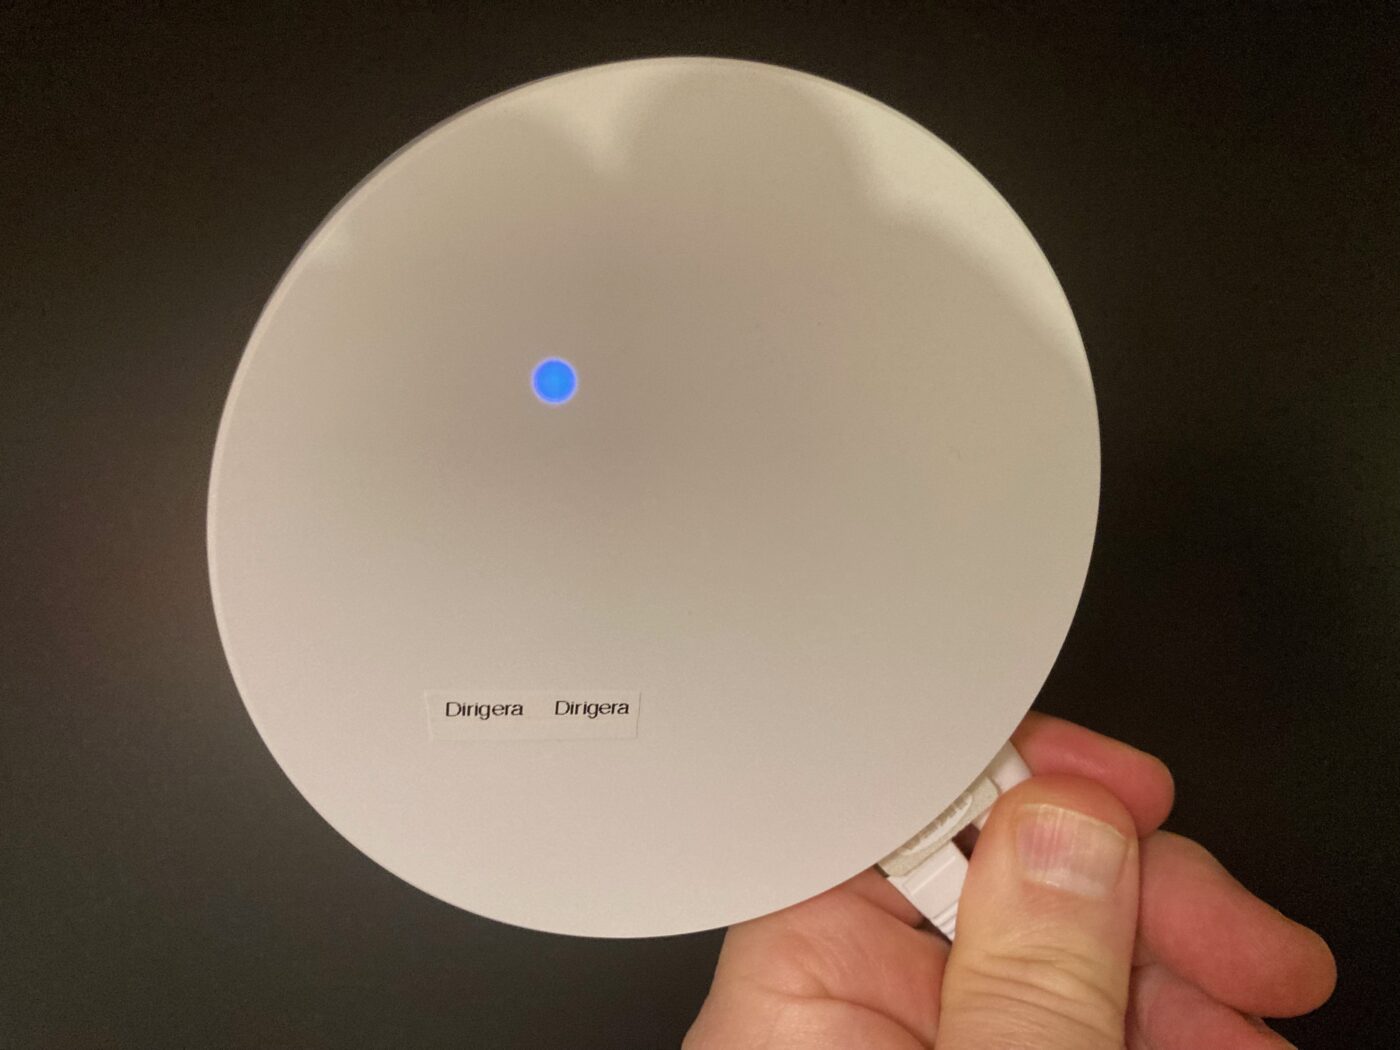
Thought it may be helpful to document my journey with the new Ikea Dirigera control which I purchased to replace my old Ikea TRADFRI Gateway . I use it to control the Ikea lights in my Ikea Kitchen. When we rebuilt the kitchen the Tradfri gateway connected to Apple Home but over time this stopped working. In case your wondering, I needed the Ikea lights to work remotely as the light switches in my kitchen are poorly placed and rewiring was not a viable option. Also the other half my lights in the Kitchen work perfectly using Caseta by Lutron including integration with Apple Home. So here are my installation steps:
Nov 3 2022 AM
I am currently running IOS 15.6.1.
- I prefer to work on an iPad rather than an iPhone so I installed the Ikea Home Smart App on the iPad. This however did not work as the prompt to accept the license agreement does not display on the iPad but did work on the iPhone. So iPhone it was.
- Ikea suggests plugging in the Ethernet cable first and then the power cord. The unit boots and the white light on the top pulses. If this does not happen, push the factory reset button (which I did not have to do).
- I connected the remote Tradfri wireless dimmer first – it connected with no problems.
- I then tried to connect the TRÅDFRI Drivers which physically power the lights, which I could not get to connect. I was expecting something to come up stating that since I already had a Tradfri Gateway I would need to migrate to the new Dirigera but no such luck. So then I disconnect and powered off the Tradfri and was able to connect the Tradfri Drivers. Then I set the drivers to be controlled by the Tradfri wireless dimmer which worked. So now I have the lights controlled by the dimmer using the new control unit.
- I tried connecting the new Dirigera control unit to the Apple Home App and this failed (control unit not found) which is what happened with the Tradfri Gateway. As Matter is not fully rolled out yet by Ikea nor Apple this was not unexpected.
So now we wait.
Nov 3 2022 PM
After others have said they could connect their Dirigera to HomeKit I did some more research and someone on Redit casually mentioned that you could only connect a Dirigera to HomeKit within the first 10 minutes of a Dirigera boot. So I shut it down (by pulling the power cable out) and then added it as a new control unit by scanning the QR code on the back and it worked with IOS 15.6.1. Now all lights function within HomeKit. What a way to organize things – no documentation and no method of finding this out. Thanks Ikea.
Problem solved.
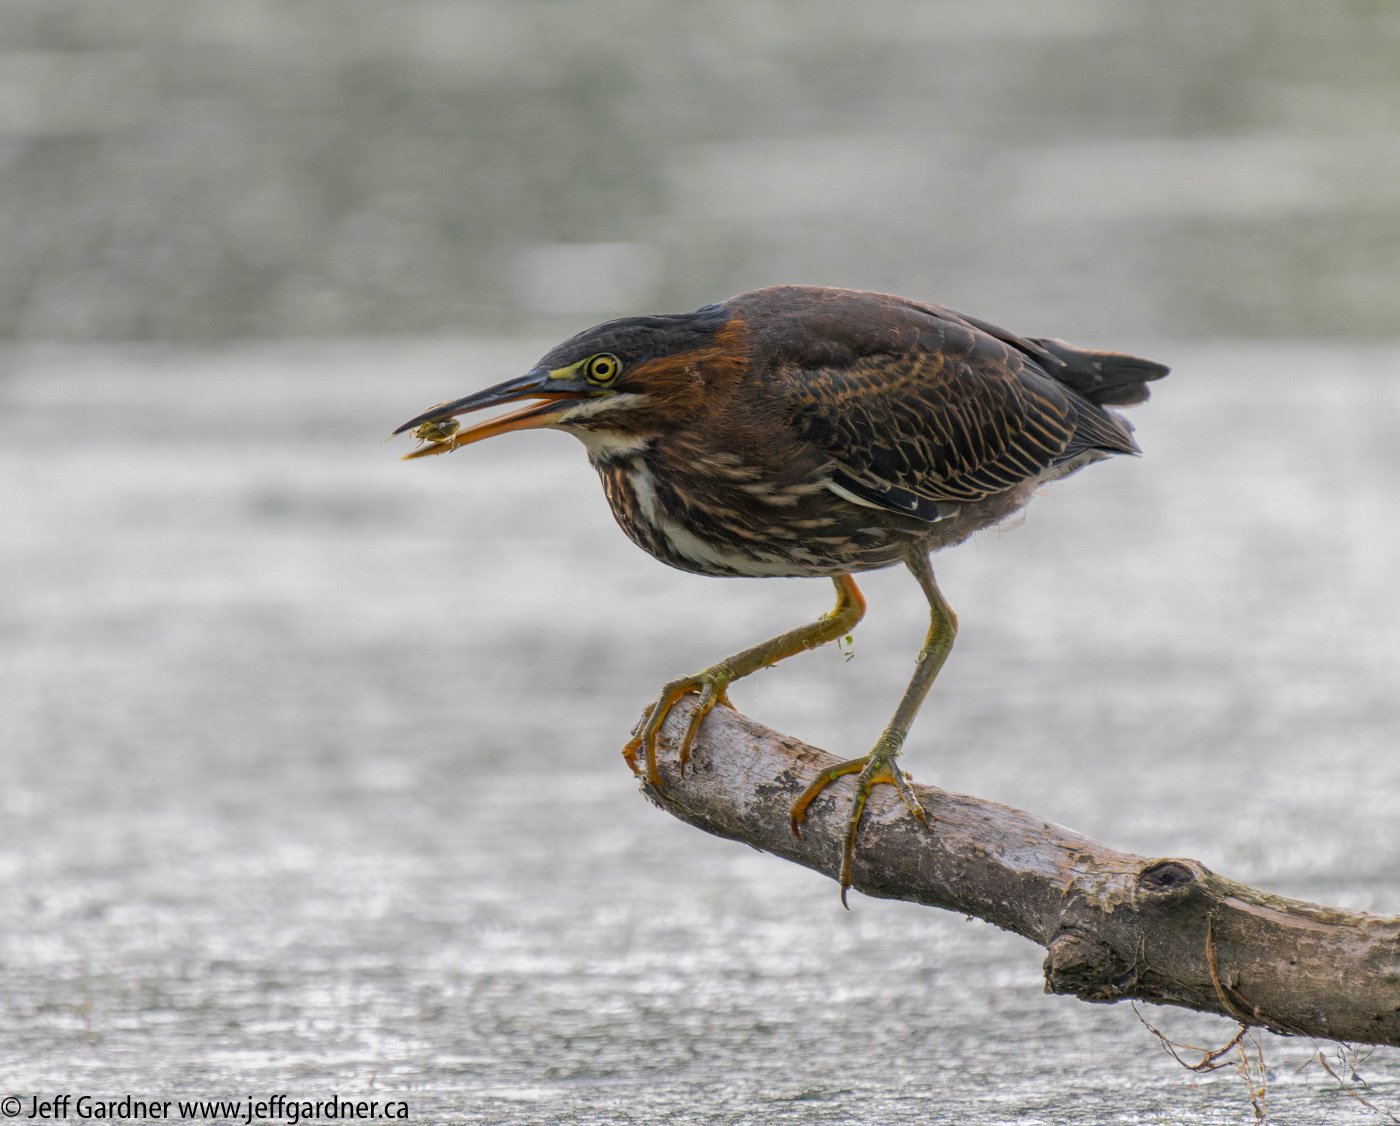
The following set of still images were shot on a Sony A1 at 20fps. Images that were out of focus were dropped prior to making the clip.
Some things I did right:
- Sony A1 Ver 1.30 firmware (Eye AF was subsequently improved when I returned from Point Pelee)
- AutoISO – most shots at ISO 10,000
- Shutter Speed: 1/8000
- Sony 200-600 + 1.4TC
- Aperture: f9.0 wide open
- AWB
- 20fps high speed
- DxoPureRaw 2 noise reduction
Lessons Learned:
- Turn off Crop Mode – resolution of A1 in crop mode is 5616 x 3744 (21 Mpix). There is really no advantage to using it, however I was trying to save card space. The disadvantage is that if the bird does spring to action as in this clip, crop mode caused clipped bird wings.
- Flexible Spot AF is too small for fast action – would have preferred something much larger
- The exposure changed throughout the shoot. This is caused because when I punch in to correct AF, I also used Spot Metering. For some reason Sony reduces the exposure by ⅔ of a stop, this caused problems for a movie but the stills are OK. I have disabled Spot Metering regrettably however you could use Spot Meter with an Exposure Compensation of +⅔ as a default. May test this out some day.
- perhaps shooting in manual would be wiser than the Aperture mode I used, as the movie has changes in exposure (shutter speed).
Movie: PPelee_Blue_Heron

Many photographers seem to struggle to obtain sharp images with long lenses. Take for example the Sony 200-600 with Teleconverter (TC). I have tested this lens with and without the 1.4 TC and it is remarkably sharp in both cases. Given its price point its a very popular purchase and the image quality is fantastic. Contrary to popular opinion, the 1.4TC appears to have NO NEGATIVE IMPACT on image quality. This is not a common senerio as in the old days (a couple of years ago) a TC always degraded IQ. And even though the 200-600 is a zoom, it is sharper than my old Canon 500 F4 II, a fraction of the size, weight and cost.
I believe sharpness problems often reported are due to using too low a shutter speed for such a long lens (840mm) as using too low a shutter speed causes motion blur which is further compounded by high resolution sensors found on the A7R4 (61Mpix) or A1 (50 Mpix).
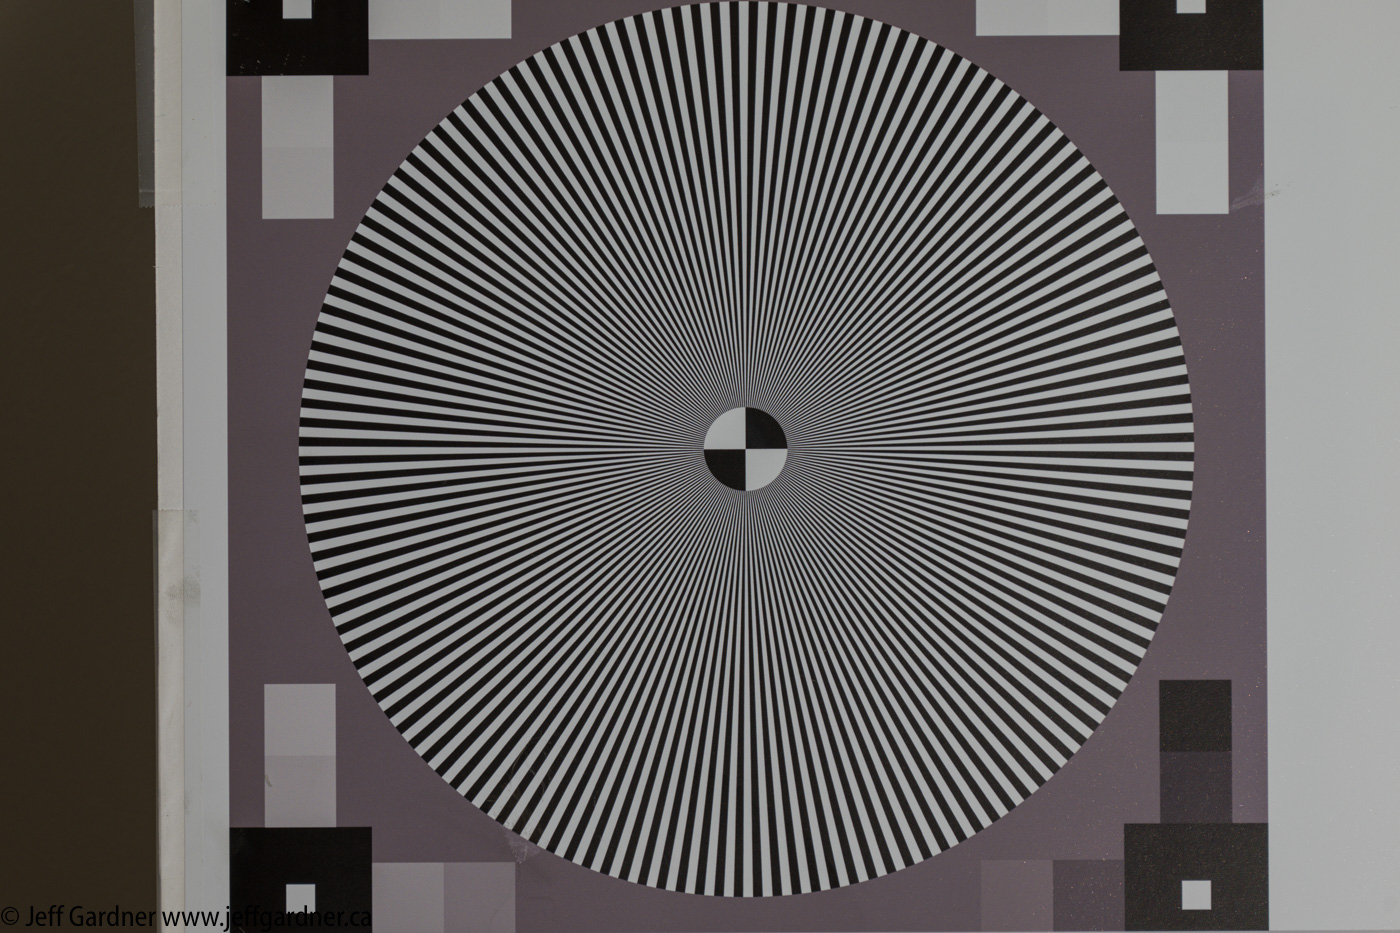
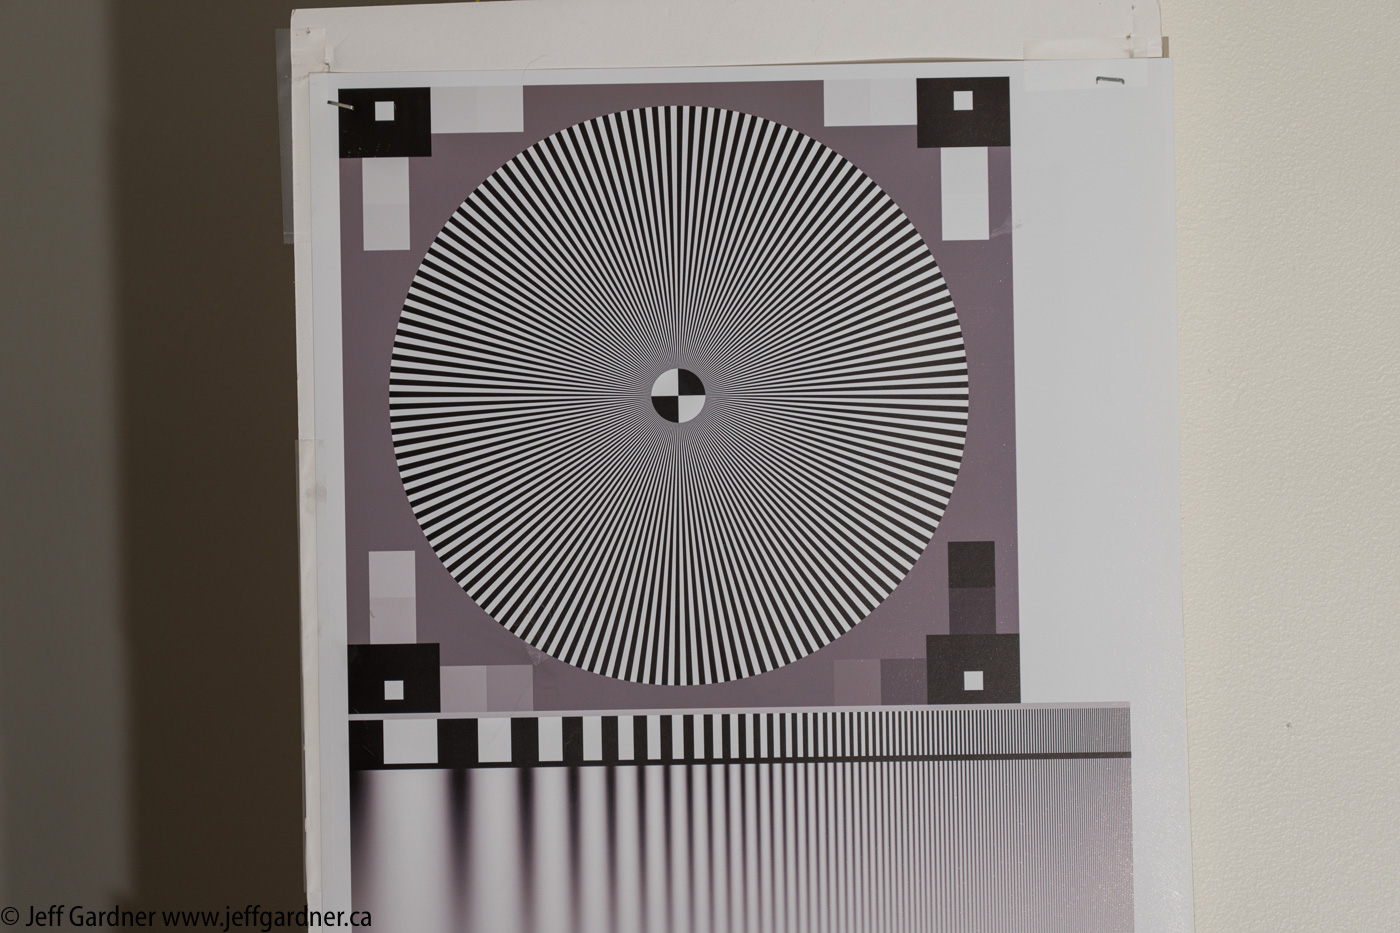
In the field it’s sometimes difficult to pin down the causes of problems, so I did some testing in the studio on a tripod to eliminate the blur caused by motion of the subject. You can see from the test shots below that the lens with or without a TC is remarkably sharp.
So if the lens with a TC is sharp in ideal test circumstances what causes the problems in the field? Basically following the old rules for shutter speed using the reciprocal rule of the length of the lens, an 840mm lens (600 x 1.4) the shutter speed would need to be around 1/1000 sec. However with high resolution sensors this rule needs to be at least doubled, which would allow for a static subject to be photographed at distance with no motion blur introduced by the photographer. Milage would vary depending on the photographers shooting technique in controlling movement of the camera/lens.
Since the lens is often used with wildlife / bird photography, even higher shutter speeds are required to account for the motion of the subject. 1/3000 may be a good starting point for small birds on the high res bodies. Results will vary depending on the distance, shooting conditions and subject.
Since the lens is F6.3 without a TC and F9 with a 1.4TC, I suspect most shots will need a high ISO to maintain a high shutter speed. Dealing with noise will then be a issue. On the A9 and A1, at ISO 12,800 – noise IMO is manageable in ACR. With DxOPureRaw I am testing the results in the field now, but somewhere around ISO 20,000 produces spectacularly sharp images with acceptable levels of noise. At any ISO, DxOPureRaw produces superior results to Adobe Camera Raw. Sharpening and noise reduction in ACR should be turned off when using DxOPureRaw. My understanding is that Topaz DeNoise is on par with DxOPureRaw however I have not tested this.
Another issue often mentioned is the need to ‘stop down’ the lens to ensure it is sharp. Testing once again tells the true story. At F9 (wide open with a TC) through F16 the lens is sharp with no appreciable difference at any of those apertures. Of course stopping down further increases the need for higher ISO’s a – so in my mind, given the need to maintain speed and better bokeh, wide open is the way to go unless greater DOF is required for the specific shot. I have tested two copies of this lens, both were consistently sharp wide open and to about F16 or more before diffraction was visible.
The other popular misconception is that the OSS (Optical Steady Shoot) should be turned off when on a tripod or shooting higher shutter speeds. Once again testing proves this to be false. There is no down side to leaving OSS on. Obviously at lower speeds on a tripod or when hand held, OSS will help reduce camera motion.
I am happy to send DNG files proving the above statements to anyone who is skeptical, as the above points are all fully tested.
I do think that a 1.4TC may very well slow down the auto focus on the A7R4 and A9. As for the A1 I don’t find there is an appreciable difference in AF speed with or without the TC, as auto focus appears to be instantaneous in both cases.
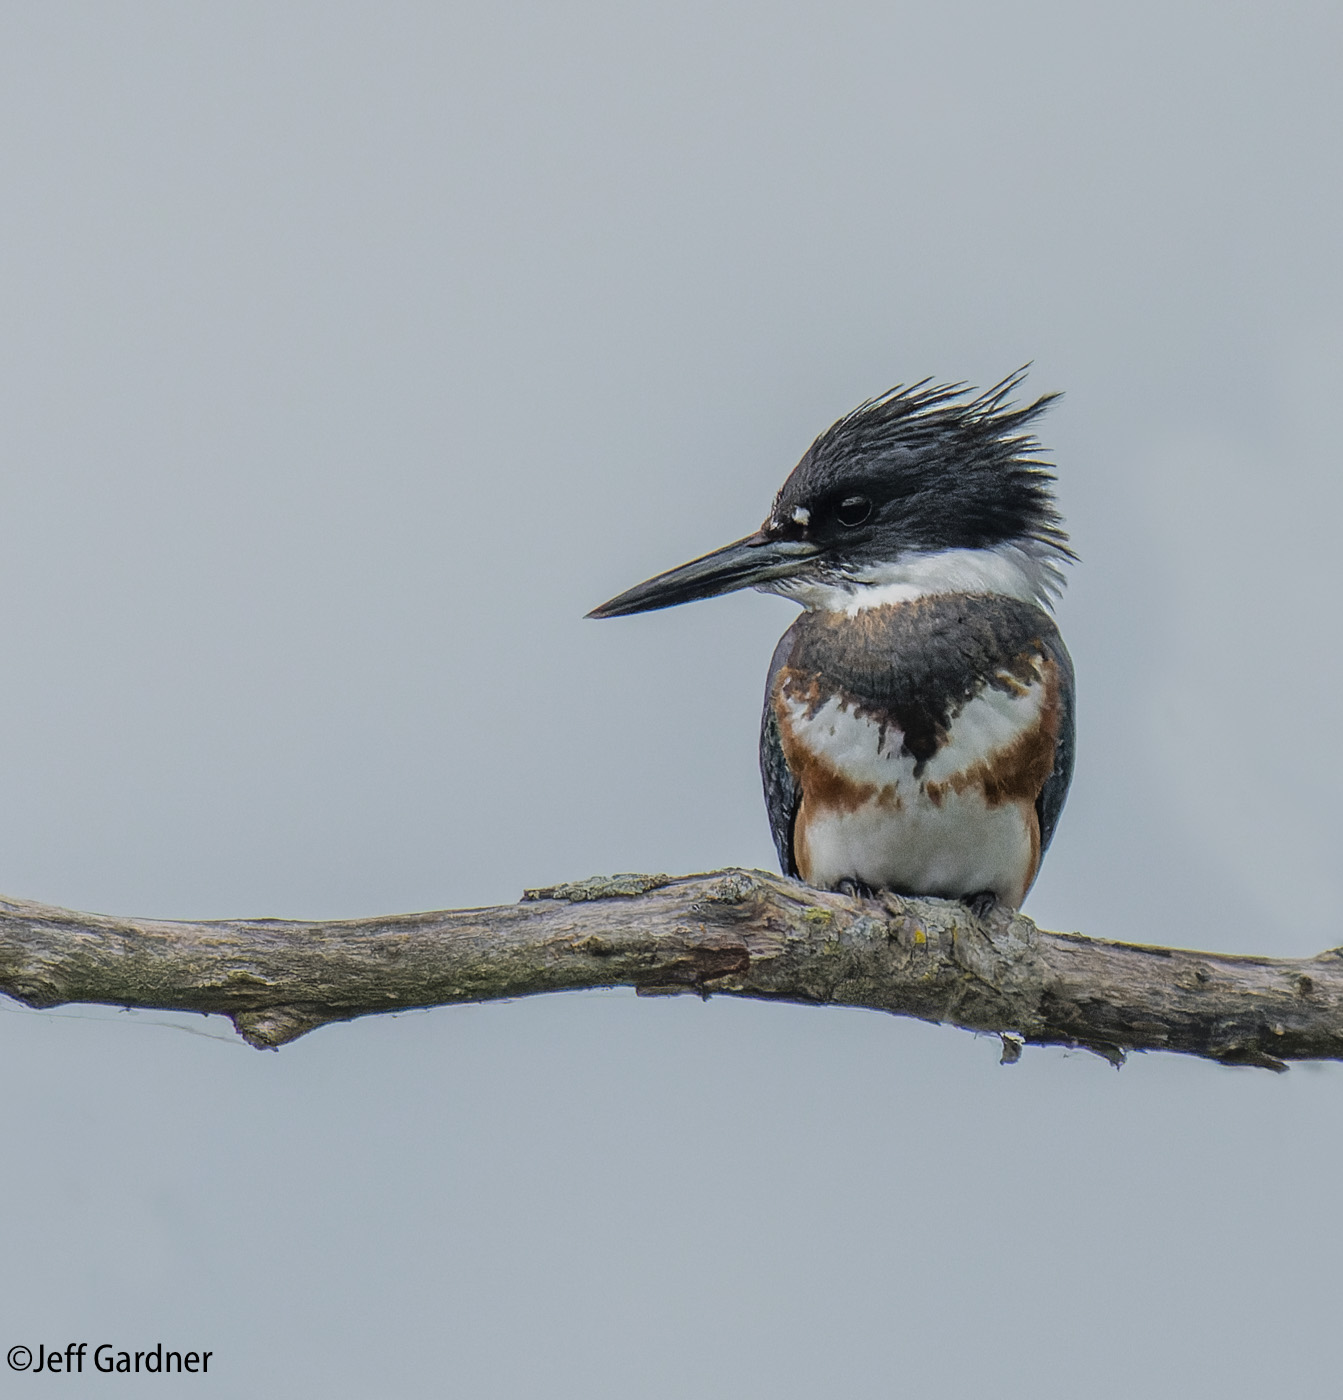
So what’s the Sony 200-600 Sharpness with 1.4 TC like in the field. Once again I have spectacularly sharp results providing the shutter speed considers the shooting conditions and subject.
So that’s my opinion – the Sony A1, 200-600, 1.4TC and DxOPureRaw is simply a game changer that will change how we shoot and process ‘action’ photography.
Sony A1 1/8 sec at f9.0 FE 200-600mm F5.6-6.3 G OSS + 1.4X Teleconverter no sharpening or noise reduction:
Sony A1 1/15 sec at f6.3 FE 200-600mm F5.6-6.3 G OSS (no TC, no sharpening or noise reduction):
A1 200-600 with TC, ISO 12,800, 1/1000 (slower speed as taken in dark conditions) hand held OSS#1:

Draft settings for Sony my Sony A1
Ver 1 Aug 20 2022: Sony A1 Settings
In order to keep track of how performance is going over time here are the disk speeds of my various computers and drives.
Computer iMac Pro 2017
8TB OWC Onvoy Express TB3: Read 1457 W1327 (BlackMagic Diskspeed)
Internal 2TB SSD: Read 2443, Write 2838
G-Tech 40TB: Read 816 Write 1096 (seems oddly slow).
How to Stain Cedar Shingles and Shakes
There were only a few snippets of information out there on a good method of mass staining all 6 sides of cedar shingles or shakes so I thought I would prepare a more comprehensive posting.
We need to stain and install 600 sq feet of cedar shingles and wanted to pre-stain all 6 sides prior to installation. The problem is how to quickly stain over 1000 shingles and how to let them dry without messing up the painting area with drips or leaving smears on the wood. Painting with a brush and leaning them against something seemed to be too daunting and slow so this is what we came up with and so far it appears to be working well.
We considered hanging the thin end on clothes lines, for us that wasn’t feasible given the weather and our layout. Another good idea is using rain gutters, attached to the walls and tilted to let the drips of stain run back into buckets but that too seemed impractical as we hoped to do most of the work in our garage.
Our approach was to rip many kerf cuts through 2×10’s and insert the narrow end of the shingle into the kerf cut to dry. We cut a kerf every ¾” (11 in total) through three 2x10x10. We used a ⅛ kerf, which I tested the width of prior to the final cuts, but in the end there were a few that didn’t quite fit. A slightly wider kerf may have been better. For those that didn’t quite fit, we just supported them between those that were secured. We figure we got about 100 shingles in a single 2x10x10 which is pretty good density given our work space in the garage.
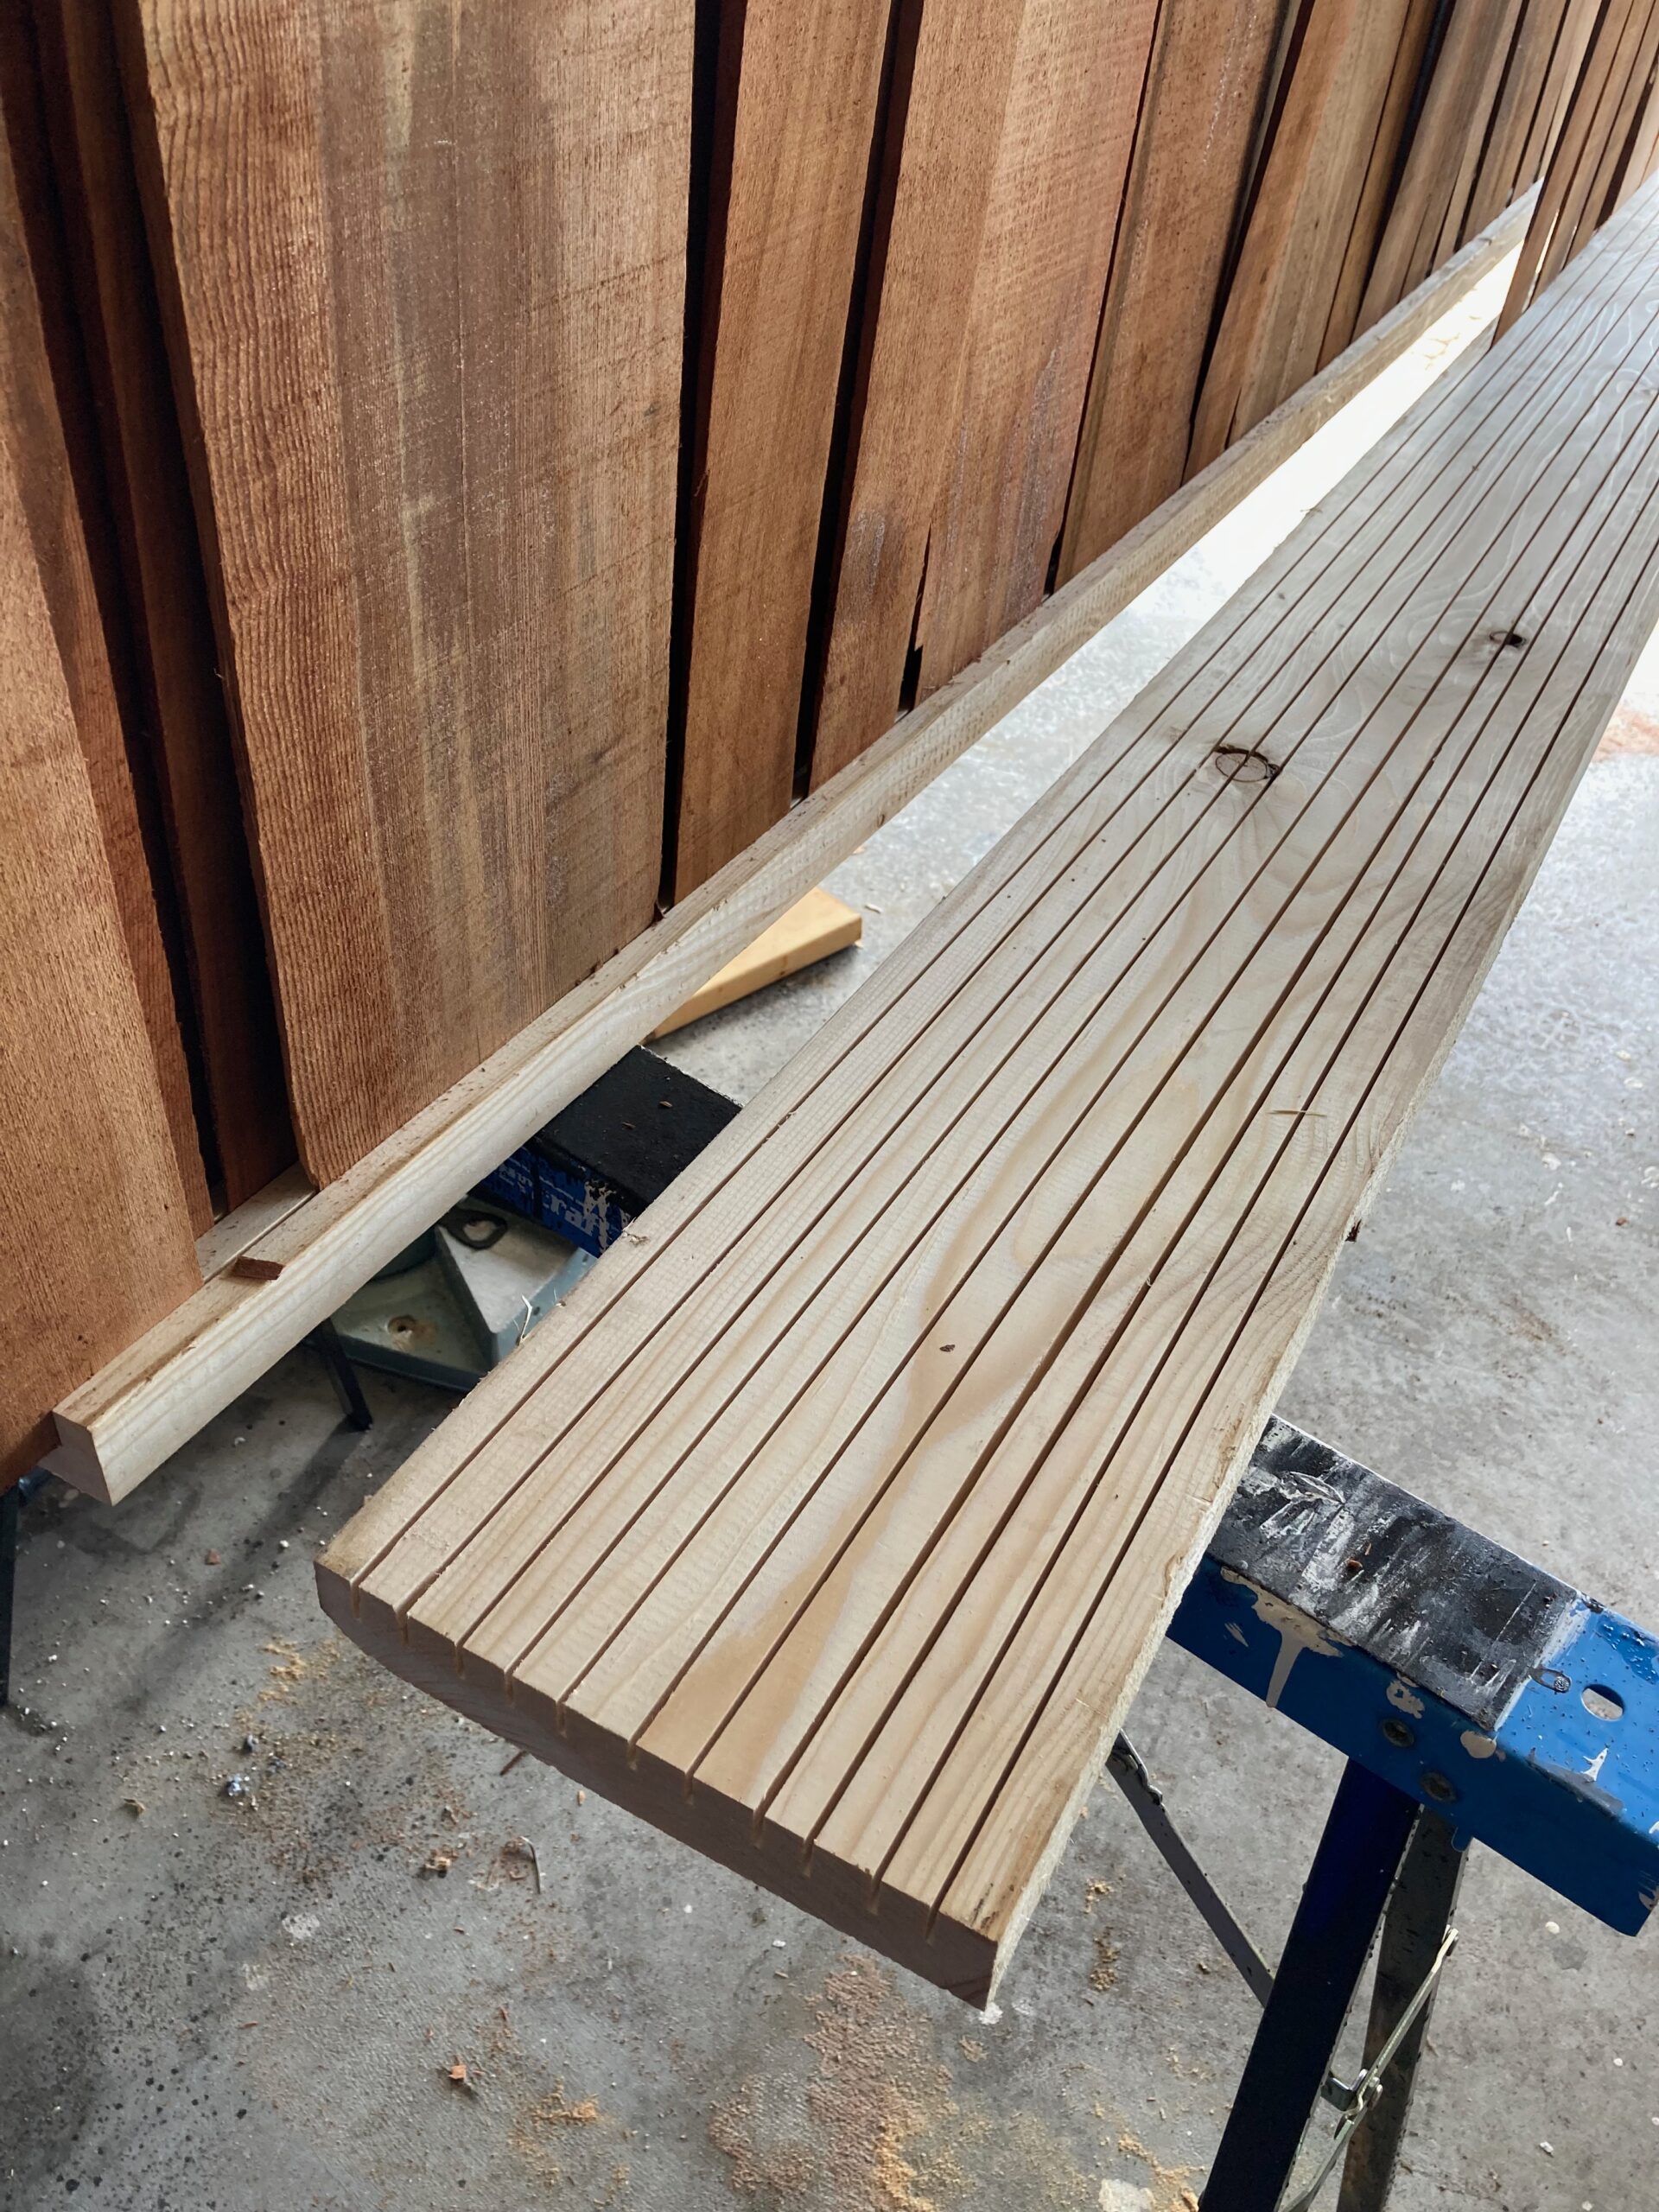
 Prior to staining, our shingles arrived totally soaked and given limited availability due to Covid, we were lucky just to get these so we kept them and are using this technique to dry them first before staining. That’s why you are not seeing any drips of stain, they are simply wet shingles.
We figure it will take 5 days per batch to dry the wood enough before we can stain them.
Once I get to the staining I will update this post.
I believe this is a great way to send images – once you set it up in Lightroom, you can just use the print template for the next shoot:
The layout uses the following format – then Print to PDF using the Printer… button at the bottom left of the LR screen. I don’t know if Windows handles the production of a PDF without purchasing additional software but Mac can.
