Holding the Option Key on Reboot prompts for the Disk Drive to boot from, however some drives are too slow to start (such as ARECA T2 8 disk array) which takes a few minutes to fully start. Therefore its necessary after the prompt to hit (Right side of keyboard) Option+Shift and (Left side keyboard) Command +
I have made a number of changes to my system lately and over the last few months Lightroom has consistently slowed down. This fix seemed to have the greatest impact though I can’t say I see how it could improve performance, it certainly has.
Add administrator permissions to the following folders or files (CMD-I on folders or files)
1) Go> Go to Folder: /Library
Logs/Adobe
Caches/com.adobe.LightroomClassicCC7
preferences/com.adobe.lightroomClassicCC7.plist
Application supports/Adobe/Lightroom CC
2) Go> Go to Folder: /users
Users/Shared/Adobe
3) Purge cache (launch Lightroom and go into Preferences)
Lightroom> Preferences>Performance
Camera Raw Cache Settings: Purge Cache (click that button)
View Cache Settings: Purge Cache (click that button)
LR CC Classic creates a preview of an image for use within the Develop Module and places it in file Previews.lrdata. This file is referenced to prevent the dreaded “Loading” message as you move from one image to another.
I had to move my LR Catalogue to an external hard drive because the LR Previews file Previews.lrdata grew to 700Gig for a LR Catalogue of 200k images. Eventually I figured out how to move the Previews.lrdata to a separate external drive and I have a link to for those instructions at the end of this post.
There are numerous issues with Previews.lrdata:
It does not shrink when previews are deleted
Previews are removed from it after 1 day, 1 week, 30 Days or Never. I rarely finish editing files 30 days after import so I chose NEVER which is not optimal.
Ideally the Previews file is on a fast hard disk yet not my SSD which has insufficient space for it. Leaving everything else involving the LR catalogue on the SSD seems ideal.
Individual previews were being created by LR a crazy sizes – for a while 7000 pixels – perhaps due to a dual monitor arrangement or some other bug. Also images imported from my laptop had different preview sizes.
So I needed a better strategy then provided by Adobe – was my current 700GB previews file realistic for 200k images and how big will it be when I have 300k images? Would I eventually purchase 2TB SSDs just to host the Previews.lrdata?
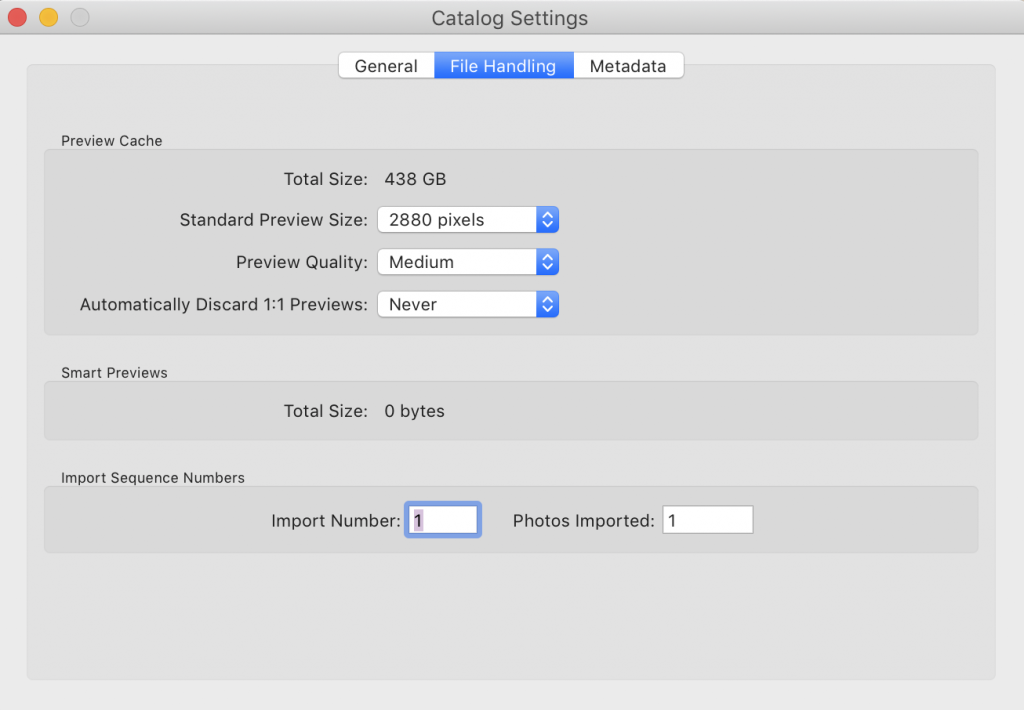
So that got me thinking – I started with a LR Catalog of 30k images many years ago and the previews file was large but manageable. To improve performance of LR -which has always been sluggish even on a 6 core 3.5GHz Xeon 64Gig RAM, I at some point set the Preview Cache settings to “Automatically Discard 1:1 Previews” NEVER. Certainly that would account for a larger size but 700Gig seems excessive even though it did avoid the “loading” message within the Develop Module.
Over time my screens changed to higher resolution 4k and dual monitors, and I started using a Laptop on trips. My Standard preview size varied over time and at one point LR set it to over 7000 pixels – presumably due to a dual monitor setup or some other wonky bug. So I relented and changed the Catalog Settings File Handling from “never”to 30 Days. Still the Previews.lrdata stayed at 700Gig.
So I deleted Previews.lrdata. Every time I moved from one image to another in the Library Module, LR rebuilt the preview as expected and that took time. To remove that delay, I manually selected all of the files that were less than 1 year old (using a Smart Collection) and set the standard preview size to the actual size that would fit in the LR window “Loop View. For me that was 2880. This is my current setting and as you can see the preview Cache is 439GB for 1 years worth of images. I often use a 50MB camera, so your results may vary.
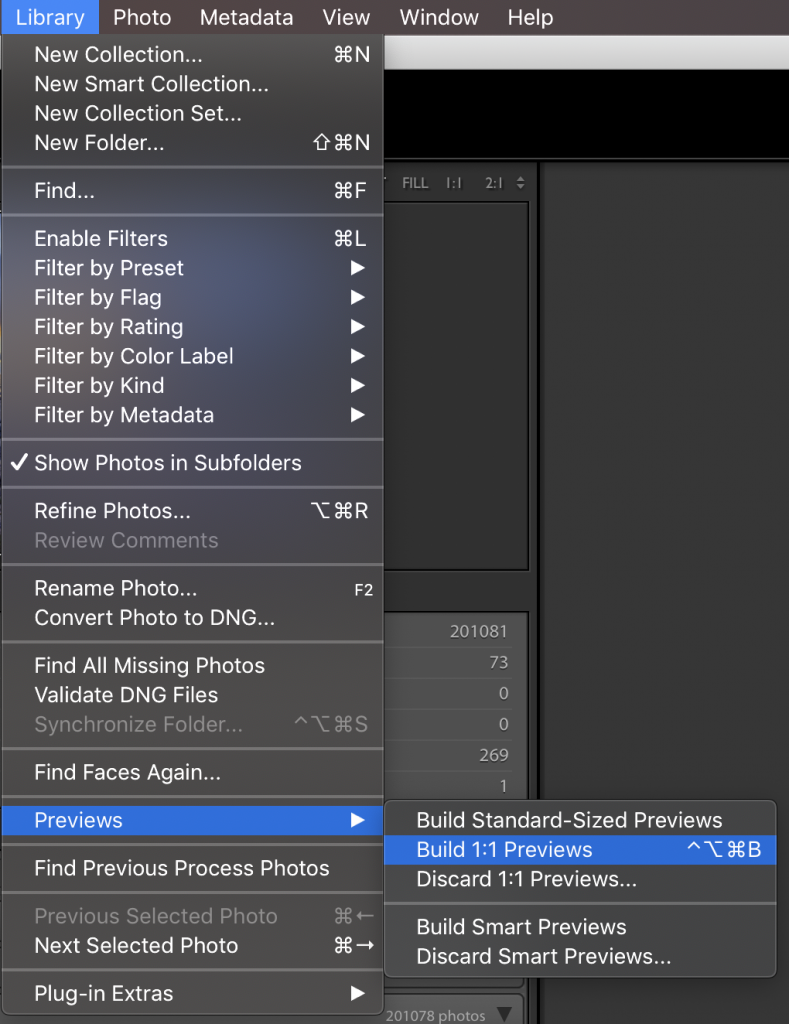
How to rebuild the 1:1 previews:
So that’s where I stand now, no loading messages and LR is quite peppy. It may even be worth changing the size to Build Standard-Sized Previews and leave it like that. When zooming in the Library Module LR would have to build the 1:1 which would cause a delay but the size of the Previews.lrdata would remain smaller.
My SSD is too small to contain both the LR Catalogue and the previews file because I have 200K images and the Previews.lrdata is 700GB. To improve overall performance I have moved everything in the LR Catlg folder to the SSD except the previews file and placed the Previews on a separate drive which I called Areca-T2. To trick LR into using the Previews.lrdata on Areca-T2 a symbolic line file is used to refer all applications including finder to the actual location on Areca-T2.
To create the symbolic location, a ln unix command is used to place a symbolic link in the location that the previews.lrdata file would typically reside, forwarding it to the actual previews file on drive Areca-T2.
The basic format is: ln -s “path to previews file” “phsical file location of Catalogue/Previews.lrdata”
Note that moving the actual file on Areca-T2 or the symbolic link will break the link and it must be re-established.
Open a Terminal window and enter the following command:
To remove a fringe (often caused by sharpening or HDR high contrast edges):
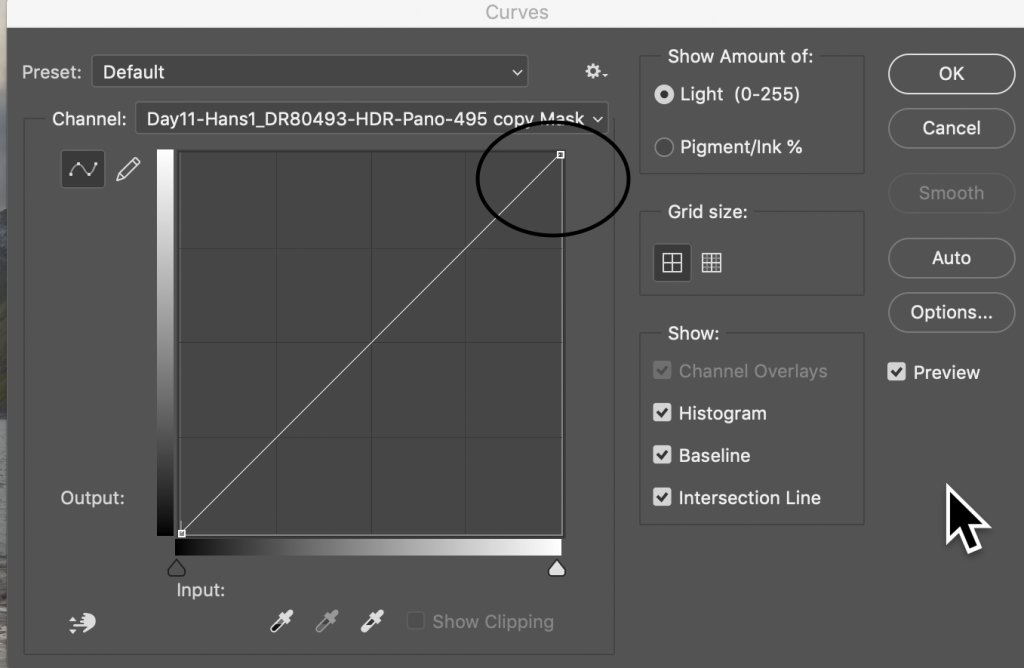
Create a mask of the object with the Fringe (example Mountains)
If the mask is fuzzy or needs to be enlarged or contracted: Option Click the mask then: Image > Adjustments > Curves and correct the edge of the mask so that it reveals the Fringe and protects the image, typically by adjusting the white point. (Create a higher contrast mask). Its also possible to select the Mask (Cmd+Click mask) and Select > Modifiy > Expand/Contract.
Now edit the Image with the Smudge tool, pushing the pixels from the image area (example Sky) into the Fringe area. Adjust the size of the Smudge Tool as required.
When editing files from LR to PS – over the course of time some files grow and exceed the 4gig TIFF limit as layers are added and in this case a TIFF file already exists in LR that can’t be re-saved. In this case the following workaround is available:
You likely just received an error in PS stating the file can’t be saved because it exceeds 4 Gig
In PS: Edit>Duplicate. This creates a new UNSAVED File in a new tab. The old TIFF tab is still open.
Save the new file as a PSB (Large File with all layers) – in the same location as the original TIFF file.
Switch to the Original Tab – this should be a TIFF file.
File Place Linked – select the new PSB file.
Delete all of the other layers in this TIFF tab (as they are now imbedded into the PSB).
Save the TIFF file. This will now show up in LR with the contents of the larger PSB file.
Keeping both PS tabs open (the TIFF with the Link) and the PSB (with the layers) will update the TIFF every time the PSB is saved (at least on a Mac – maybe not on Windows). This has pros and cons as the rendered image will appear in the TIFF but this takes some time and you will see a “updating type of message”. Saving the updated tiff will update LR. To avoid this delay, close the TIFF tab in PS and only update the tiff by opening it in LR when you have completed the updates in the PSB.
Another somewhat ass backwards approach if the original file is not already a TIFF:
Save original file as PSB (Photoshop Big)
In the Original File Command-A to select all pixels in the canvas (to grab the image dimensions)
Edit>Copy Merged (puts image into clipboard
File New (should have dimensions from steps 2+3 above
File > PlaceLinked
Save New File in same folder as Original as a TIFF file (don’t over write the PSB) and Include “Linked” in the filename
LR > Sync to bring in the New Linked TIFF File.
To Edit the large file from LR, open the smaller Linked TIFF file then double click on the Linked Layer.
To view changes to the Original File, the linked TIFF file must be opened and the Linked Layer Right Click> Update Modified Content