Please dont copy my stuff.

Monthly Archives: January 2014

Clone Host Machine & Run as Virtual Machine for Testing

Problem

I need to be able test software changes before applying them to my production machine.  I also don’t want to duplicate my current hardware environment or make the job too labour intensive.

I could just clone all my software to another disk and reboot.  But to move back a forth between the clone and my production environment was a process I found too tedious – requiring a reboot each time I needed to check things.

Solution

I have decided to use CCClone to clone my software environment and VM Fusion to simulate my hardware – running this cloned environment as a Virtual Machine on the same hardware as my production environment.  I basically see a copy of my machine as a window on my production hardware.

When changes are verified on the clone, I apply those changes again to my production machine.

One Time Setup

These instructions are a bit out of date but I am keeping them as reference since I no longer need the one time setup.

  1. Create a Virtual Machine (VM) to receive a copy of the host machine.
  2. Created a new OS X VM from scratch called “Middle Man”.  “Middle Man” is a vanilla machine which contains two bootable hard disks.  One is the Middle Man Boot Disk.  The other second drive is the “Clone of Host”.
  3. At this point you would think you could boot from Middle Man on the Host,  but it has the same uuid and mac address as your Host.  When I attempted to boot Middle Man on the Host,  I just got a grey screen at boot time.  To get around this problem (and as as a one time activity) I had to copy the .vmwarevm file to another machine running Fusion where I was prompted for “did you move or copy the VM”.  Reply “copy” and Fusion will change the uuid and mac address within the VM (and what ever else is required to run it).  Then copy the .vmwarevm file back to the Host where it will now be bootable from now on.
  4. Use CC Cloner to transfer a cloned image of the Host Boot Disk to the “Clone of Host Hard Disk”.
    1. This will require authenticating from the CC Cloner Application on the Host to “Middle Man” VM across the network.
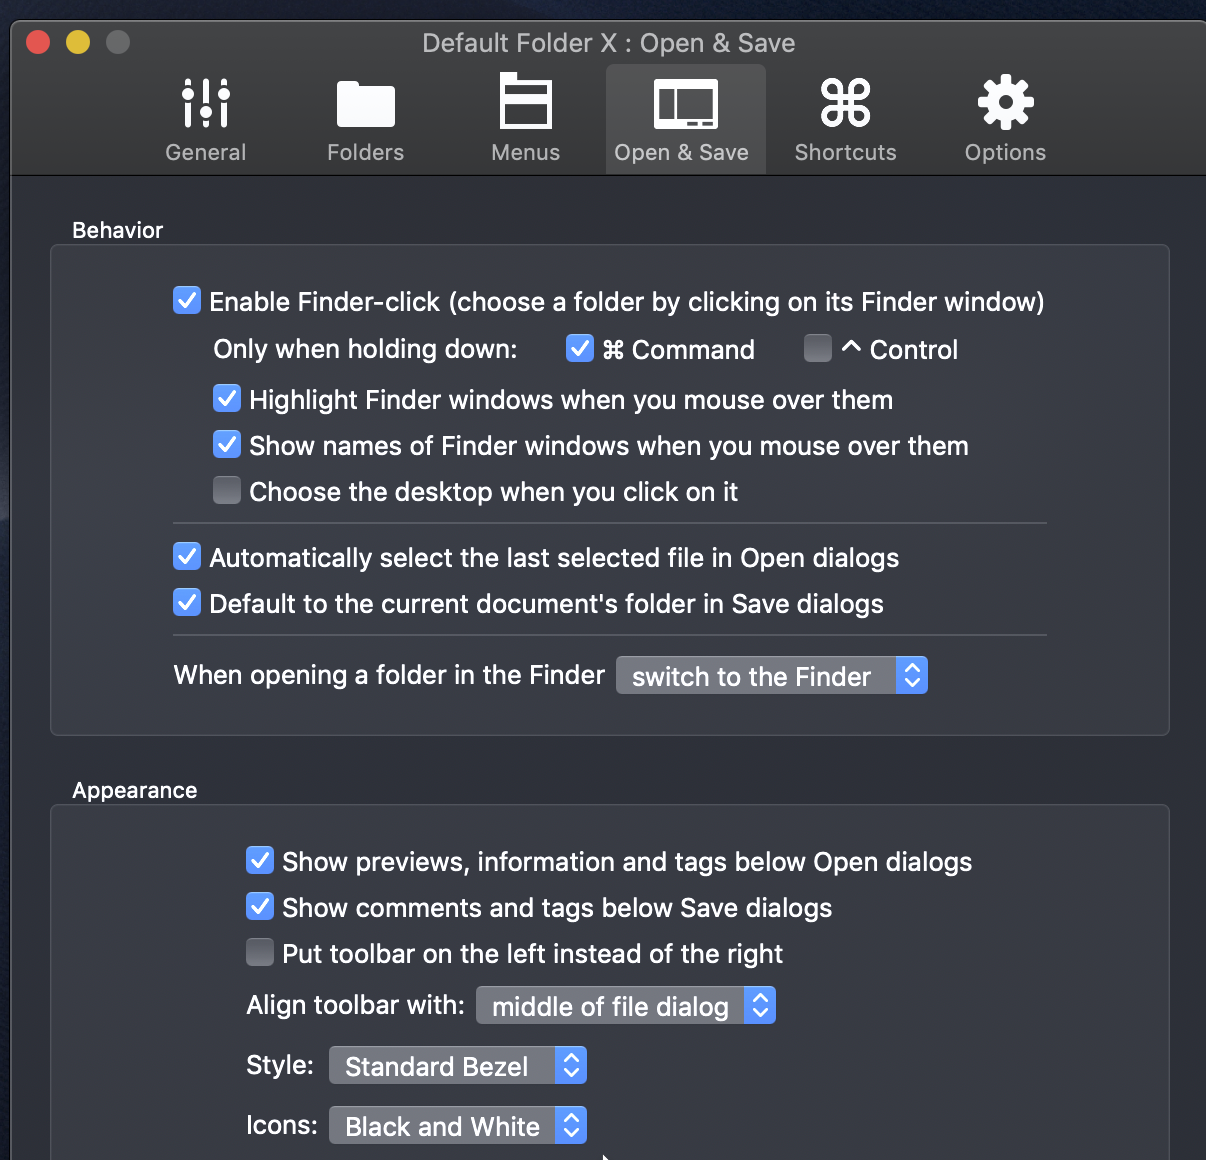
  5. Using the Settings icon in Fusion (the wrench), click the “Startup Disk” icon and change “Clone of Host” to the “startup disk” – typically Fusion refers to this drive as “Hard Disk 2”.Re-boot the VM by hitting the Restart button.
  6. A clone of your host configuration will now come up as a VM running on the Host.
  7. Perform any changes/testing within the “Clone of Host”.  When ready, re-apply the same changes to the Host.


Creating / Refreshing the “Clone of Host”

There are two approaches to cloning the current Host (Production System) to the Test System:

One – If the difference between the Host and the Test system are not too great: Clone the live system over the network to the running test system.  This requires the Test system to have two hard disks, one that is operational and another to receive the the new clone.

  1. When in CCClone select Destination > Remote Macintosh …
  2. Ensure that the VM can connect to the Internet.  In my case my MacPro has two Ethernet ports.
  3. Start the Clone which will transfer the Macintosh HD of the Host to the Test drive
  4. Re-boot the Test system – using the new clone as the boot disk

Two – after a major upgrade of the OS, the differences between the Host and the Test system are great, running a clone over the network has been slow and not reliable.  Therefore its better to use a USB HD as an intermediate storage location for the clone of the Host.  Then using CCC clone the USB HD to the Test system, using either of the Test systems two hard disks.  Then boot of the updated TEST HD.

Some Issues to watch for:  VMWARE can’t access TB only drives.  It will be necessary to use USB.  Also VMWARE for some reason defaults to USB 2 – its necessary to manually change the USB virtual drivers to USB 3.


My Standard Configuration Changes for a new Mac (Initial Setup)

Over the years I have developed preferences for how my machines are configured.  Every time I get a new machine or reload the OS, I have to remember to make the following changes, so I finally decided to document them to make the job easier:

Old Mac:

First if selling an old Mac here is what I need to do:

  1. Remove any licensed software
  2. Deauthorize any iTunes for this computer
  3. Use Disk Utility and erase all drives other than the Macintosh Drive – I only use one pass to do this
  4. Reboot Cmd+R and use Disk Utility to erase the Macintosh Drive

New Mac: updated April 2021

0) Turn on Firewall

1) Accessibility > Display > Cursor Size > Larger

2) Desktop & Screen Saver > Hot Corners … > Put Display to Sleep

3) Keyboard > Shortcuts

Show Keyboard views in menu bar

Modifier Keys – Caps Lock:No Action

App Shortcuts:

All Applications > Sleep ^?

Move to Studio Display (1) ^ option left arrow

Move to Studio Display (2) ^ option right arrow

Pages.app > page Break ^ Enter

Adobe Photoshop Lightroom

Build 1:1 Previews    ^\CB

Purple ^\CP

Open as Smart Object in Photoshop…

4) ICC profiles from previous machine: ~/Library/Color Sync/Profiles/JG Profiles

6) Photoshop Color Space, Lightroom Configuration and ACR

7) DHCP by mac address

8) Pages Templates – drag from old version to Pages Icon to be prompted to save the template

9)  Capture Print Presets and ICC profiles

10) Mail Font settings – see Preferences, Fonts Helvetica 18

Also Mail>Preferences>General>New Message Sound:None

11) Preferences > General > Highlight Purple, Show scroll Always, Ask to Keep, Close Windows, Recent 30

12) Keyboard Preferences > Mission Control – Turn off F12 Show Dashboard since F12 is better used by Photoshop

13) If some Apps start running automatically, in the Dock hi light the icon, press option and turn on “Start at Login” then turn it back off.

13.1) Preferences>General>Automatically hide menue bar off

13.2) Preferences>Date & Time>Clock tab>Show Date

14.1) Finger Print Reader setup

14.2) G-Raid Shuttle: Driver and Program: https://support-en.sandiskprofessional.com/app/products/product-detail/p/2377#WD_downloads

14.3) My Standard Software:

1Password

a7Info
AstroPad
Audacity – optional
Adobe Creative Cloud – Classic
Black magic Disk Speed Test

Brother P-Touch Editor
Optional: Carbon Copy Cloner – export all tasks then import
Clip Grab – free download from their web site
Copyless2

Contexts (alt-tab)
Compare Folders

datacolor
Default Folder
DxOPureRaw
Easyfind
FastrawViewer 2

G-Raid Software Utility
Image Edge (Sony)
Keynote
Library/Application Support/Adobe/Lightroom/    select presets (be selective)
Mail

Neat Image Presets and Camera Calibration
Neat Image V9

NIK Collection

New file menu
P-touch Editor
Pages

        Templates:  Finder > Menu > Go > hold down option key > LIbrary

/Library/Containers/com.apple.iWork.Pages*/Data/Library/Application Support/User Templates

* When you get to apple.iWork.Pages you will need to right click on the file > Show Package Contents

Lightroom – including presets (source: click and show in finder)

Rectangle (screen position)

Roon
Scansnap
Simple Mouse Locator (App Store)
StarryLandscapeStacker (not now)
Speedtest

SpyderXUtility

Spydersheckr 24   http://goto.datacolor.com/download/checkr24
Tidal
Topaz Labs (Topaz Glow\Topaz Studio / Impression / Gigapixel

Wondershare Filmora x
Zoom

Keyboard Shortcuts

Default Folder Settings


ARECA 8050 Raid Storage Experience

To prepare for my new Mac Pro 2013 I decided to prepare a new Areca 8050 from OWC with 21 TB of storage.

OWC did a good job of shipping the equipment and I had reviewed some other posts knowing that the configuration may be problematic, so I downloaded the User Guide in advance.

Here are my recommendations for anyone like myself new to the installation:

a) Use Firefox not Safari

b) Upgrade the firmware

For the record here are the steps I performed:

1) I installed the 8 drives (8 * 3 TB).  Got off on the wrong foot by using round headed screws that were provided, but then noticed that there were flat screws so I changed all 32 installed and then the  drives slide easily into the drive bays.

2) Used the web configuration tool on ethernet.

3) Ran the Quick configure as Raid 5 – no spare drives – unit hung even though the lights flashed – progress on the front panel stuck at at 2.8% after 10 hours.  Had to unplug the power cord to restart it.

4) Plugged back in, it started the initialization again and got to 4.3% in 3 hours.  Hung some where early in the process I assume.

4.1) Powered off by unplugging but no further progress with initialization.  Couldn’t get any response from web interface from unit.

4.2) Pulled the plug again and this time pulled all the drives.  Got the web interface to respond since there were no drives to initialize.

5) Downloaded new firmware – this is where I discovered Safari not working.  Used Firefox and eventually and got all the files installed except  BIOS file which it said was invalid.

5.1) Switched to Firefox and had no web problems however the unit keeps coming up with address 192.168.1.100 rather than 192.169.1.100 (contrary to the quick guide).

6) Restarted the Raid initialization from scratch.

7) Raid 5 Initialization: at 11:58 its at 9.3%, 10.8% at 12:03 so lets call about 1.5% in 5 minutes (18% per hour) or 5.5 hours for the 21TB.

8) 13:20  unit appears to have restarted, 28.8%

9) 15:48 – 51.8%

10) 17:50 84%

11) It finished and I configured the volumes and ran Blackmajic Disk Test: 560 MB/s Read, 635 write.

12) After 10 days – no issues so far.  Speed using Mac Pro 2013   600mB/s Read, 660 MBs Write.

13) Feb 2 – I have now confirmed that this drive it prevents the Mac from sleeping.  See http://jeffgardner.ca/Blog/?p=751


Spotlight Removable Drives (Mac)

To force spotlight to index a removable media:

Preferences>Spotlight>Privacy

Add the remote drive – this specifies that the drive should NOT be indexed.m  Close and reopen this screen.

Then remove the removable drive from the Privacy screen.  Check spotlight (Command+Space) and it should be indexing the drive.