

Command+Shift+.
I have made a number of changes to my system lately and over the last few months Lightroom has consistently slowed down. This fix seemed to have the greatest impact though I can’t say I see how it could improve performance, it certainly has.
Add administrator permissions to the following folders or files (CMD-I on folders or files)
1) Go> Go to Folder: /Library
- Logs/Adobe
- Caches/com.adobe.LightroomClassicCC7
- preferences/com.adobe.lightroomClassicCC7.plist
- Application supports/Adobe/Lightroom CC
2) Go> Go to Folder: /users
- Users/Shared/Adobe
3) Purge cache (launch Lightroom and go into Preferences)
Lightroom> Preferences>Performance
- Camera Raw Cache Settings: Purge Cache (click that button)
- View Cache Settings: Purge Cache (click that button)
4) Optimize Catalogue (within Lightroom)
File> Optimize Catalog
LR CC Classic creates a preview of an image for use within the Develop Module and places it in file Previews.lrdata. This file is referenced to prevent the dreaded “Loading” message as you move from one image to another.
I had to move my LR Catalogue to an external hard drive because the LR Previews file Previews.lrdata grew to 700Gig for a LR Catalogue of 200k images. Eventually I figured out how to move the Previews.lrdata to a separate external drive and I have a link to for those instructions at the end of this post.
There are numerous issues with Previews.lrdata:
- It does not shrink when previews are deleted
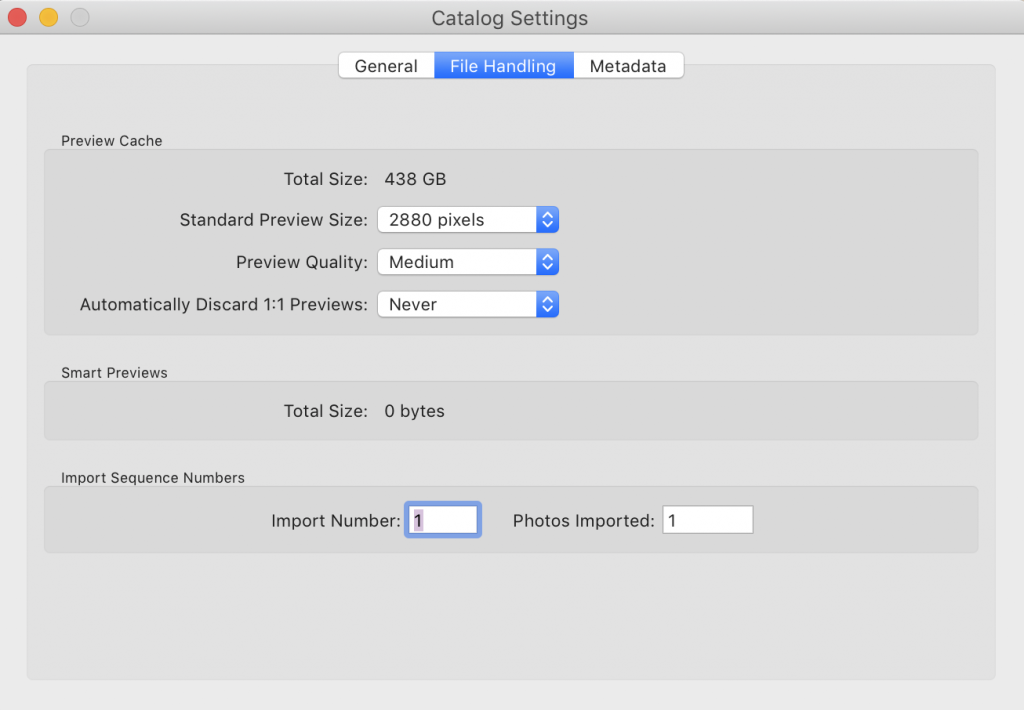
- Previews are removed from it after 1 day, 1 week, 30 Days or Never. I rarely finish editing files 30 days after import so I chose NEVER which is not optimal.
- Ideally the Previews file is on a fast hard disk yet not my SSD which has insufficient space for it. Leaving everything else involving the LR catalogue on the SSD seems ideal.
- Individual previews were being created by LR a crazy sizes – for a while 7000 pixels – perhaps due to a dual monitor arrangement or some other bug. Also images imported from my laptop had different preview sizes.
So I needed a better strategy then provided by Adobe – was my current 700GB previews file realistic for 200k images and how big will it be when I have 300k images? Would I eventually purchase 2TB SSDs just to host the Previews.lrdata?
So that got me thinking – I started with a LR Catalog of 30k images many years ago and the previews file was large but manageable. To improve performance of LR -which has always been sluggish even on a 6 core 3.5GHz Xeon 64Gig RAM, I at some point set the Preview Cache settings to “Automatically Discard 1:1 Previews” NEVER. Certainly that would account for a larger size but 700Gig seems excessive even though it did avoid the “loading” message within the Develop Module.
Over time my screens changed to higher resolution 4k and dual monitors, and I started using a Laptop on trips. My Standard preview size varied over time and at one point LR set it to over 7000 pixels – presumably due to a dual monitor setup or some other wonky bug. So I relented and changed the Catalog Settings File Handling from “never”to 30 Days. Still the Previews.lrdata stayed at 700Gig.
So I deleted Previews.lrdata. Every time I moved from one image to another in the Library Module, LR rebuilt the preview as expected and that took time. To remove that delay, I manually selected all of the files that were less than 1 year old (using a Smart Collection) and set the standard preview size to the actual size that would fit in the LR window “Loop View. For me that was 2880. This is my current setting and as you can see the preview Cache is 439GB for 1 years worth of images. I often use a 50MB camera, so your results may vary.
How to rebuild the 1:1 previews:
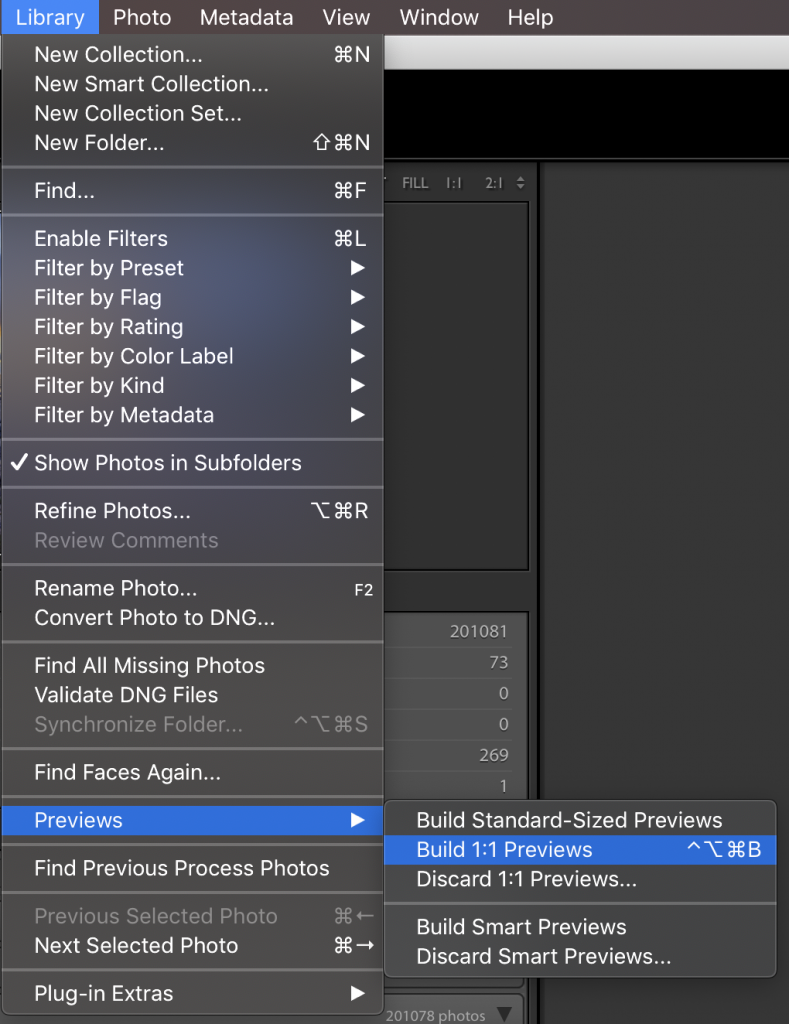
So that’s where I stand now, no loading messages and LR is quite peppy. It may even be worth changing the size to Build Standard-Sized Previews and leave it like that. When zooming in the Library Module LR would have to build the 1:1 which would cause a delay but the size of the Previews.lrdata would remain smaller.
Since my Mac has a 1TB SSD hard disk, the Previews.lrdata is still too big to leave on the SSD. I left the LR Catalogue on the SSD and moved Previews.lrdata to a separate drive off the SSD Previews.lrdata using these instructions: https://www.jeffgardner.ca/2018/12/22/lightroom-moving-lightroom-catalogue-to-a-ssd-while-leaving-previews-lrdata-on-external-disk
My SSD is too small to contain both the LR Catalogue and the previews file because I have 200K images and the Previews.lrdata is 700GB. To improve overall performance I have moved everything in the LR Catlg folder to the SSD except the previews file and placed the Previews on a separate drive which I called Areca-T2. To trick LR into using the Previews.lrdata on Areca-T2 a symbolic line file is used to refer all applications including finder to the actual location on Areca-T2.
To create the symbolic location, a ln unix command is used to place a symbolic link in the location that the previews.lrdata file would typically reside, forwarding it to the actual previews file on drive Areca-T2.
The basic format is: ln -s “path to previews file” “phsical file location of Catalogue/Previews.lrdata”
Note that moving the actual file on Areca-T2 or the symbolic link will break the link and it must be re-established.
Open a Terminal window and enter the following command:
ln -s /Volumes/Areca-T2/LR\ Previews\ Sym\ Link/LR\ 7\ JG\ Catalog\ Previews.lrdata /Users/jeffg/LR\ 7\ JG_Catalog/LR\ 7\ JG\ Catalog\ Previews.lrdata
To remove a fringe (often caused by sharpening or HDR high contrast edges):
- Create a mask of the object with the Fringe (example Mountains)
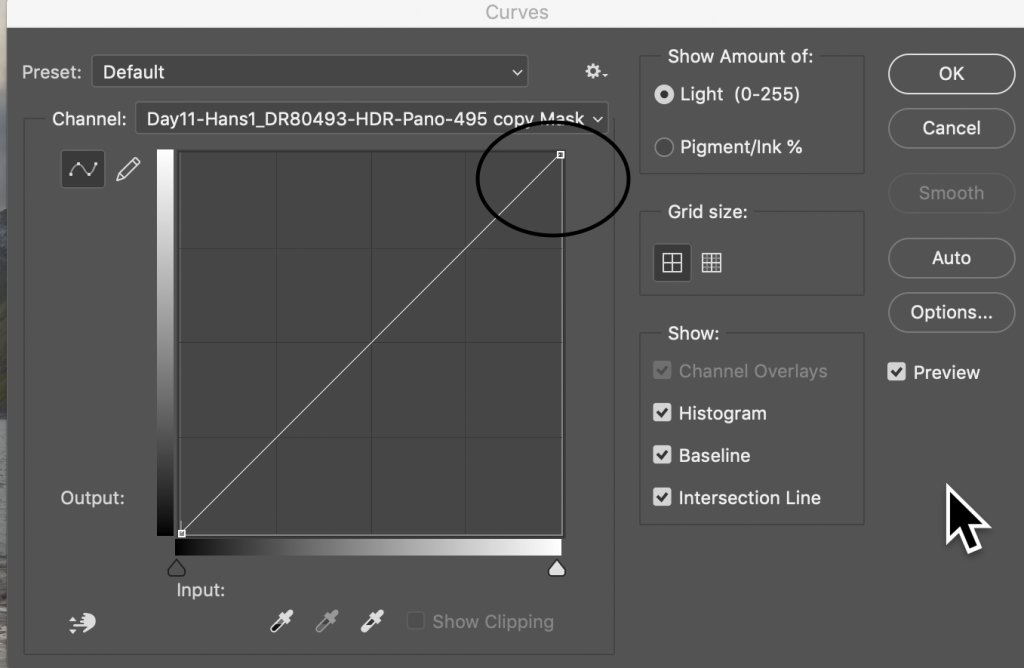
- If the mask is fuzzy or needs to be enlarged or contracted: Option Click the mask then: Image > Adjustments > Curves and correct the edge of the mask so that it reveals the Fringe and protects the image, typically by adjusting the white point. (Create a higher contrast mask). Its also possible to select the Mask (Cmd+Click mask) and Select > Modifiy > Expand/Contract.
- Now edit the Image with the Smudge tool, pushing the pixels from the image area (example Sky) into the Fringe area. Adjust the size of the Smudge Tool as required.
When editing files from LR to PS – over the course of time some files grow and exceed the 4gig TIFF limit as layers are added and in this case a TIFF file already exists in LR that can’t be re-saved. In this case the following workaround is available:
- You likely just received an error in PS stating the file can’t be saved because it exceeds 4 Gig
- In PS: Edit>Duplicate. This creates a new UNSAVED File in a new tab. The old TIFF tab is still open.
- Save the new file as a PSB (Large File with all layers) – in the same location as the original TIFF file.
- Switch to the Original Tab – this should be a TIFF file.
- File Place Linked – select the new PSB file.
- Delete all of the other layers in this TIFF tab (as they are now imbedded into the PSB).
- Save the TIFF file. This will now show up in LR with the contents of the larger PSB file.
Keeping both PS tabs open (the TIFF with the Link) and the PSB (with the layers) will update the TIFF every time the PSB is saved (at least on a Mac – maybe not on Windows). This has pros and cons as the rendered image will appear in the TIFF but this takes some time and you will see a “updating type of message”. Saving the updated tiff will update LR. To avoid this delay, close the TIFF tab in PS and only update the tiff by opening it in LR when you have completed the updates in the PSB.
Another somewhat ass backwards approach if the original file is not already a TIFF:
- Save original file as PSB (Photoshop Big)
- In the Original File Command-A to select all pixels in the canvas (to grab the image dimensions)
- Edit>Copy Merged (puts image into clipboard
- File New (should have dimensions from steps 2+3 above
- File > PlaceLinked
- Save New File in same folder as Original as a TIFF file (don’t over write the PSB) and Include “Linked” in the filename
- LR > Sync to bring in the New Linked TIFF File.
- To Edit the large file from LR, open the smaller Linked TIFF file then double click on the Linked Layer.
- To view changes to the Original File, the linked TIFF file must be opened and the Linked Layer Right Click> Update Modified Content
Feb. 5 2019 – Its About The Photographer Not The Camera
Further to my earlier post in Sept 2018 I have had time to reflect on what equipment I have and the various findings published over the last few month about the Sony, Canon and Nikon mirrorless cameras when compared to similar pro-consumer DSLRs. I believe that camera basically fall into two categories – still photography such as landscape, portrait, studio work and action photography such as sports and wildlife (I am ignoring video for now and don’t have enough experience to comment on the more esoteric manufacturers such as Phase1, Fuji, Olympus, Panasonic) so my thoughts are on the three mainstream manufactures :
| Stills: | Canon 5d IV | Nikon D850 | Sony A7R III |
| Action: | Canon 1DX II | Nikon D5/D850 | Sony A9 |
I have also made some effort to research and reflect on the three manufactures in relation to landscape photography as I am just back from Death Valley (shots here) where the three stills bodies were used with similar focal length lenses by various photographers on the trip.
Death Valley reinforced my belief that for landscape (or anything thats not action photography) it’s really not about the camera, it’s about the photographer. Lenses did make some difference, but shooting style, landscape photo techniques, ease of use, imagination and ability to post process seemed to be more influential on quality than the body or some new gadget. For landscapes, most good cameras such as the Nikon D850, Canon 5d IV, Sony A7R III all give about the same really great results. Perhaps in the future I will laugh at this, but right now I feel “really great is good enough”. So the key criteria for success for landscape/stills type photography in my opinion are:
- Familiarity – understanding the layout of the cameras controls is much more important than bells and whistles.
- Glass – If a camera make/model can make any difference, it must be mated to quality glass with a similar resolving capability. Megapixels and quality of glass are related -one without the other is useless. Buy the best glass you can afford and don’t waist money on a great body with a cheap lens.
- Genre dictates equipment: The genre of the image (action, still, studio … defines which equipment works best. One body can’t do it all. Right now “action” bodies seem to boil down to lower megapixel in the low 20 MB with great auto focus, frame and buffer rates and high megapixel bodes >30 MB for still life.
- Post Processing – toning, sharpening, noise removal are generally not well understood and creative post processing is strangely limited – many good photographers simply not bothering to try.
- Weight – being able to fly and lift a kit is critical- if you can’t carry it, it’s worthless.
Lessons Learned – equipment:
- 5dsr – primary body (50 meg) which I could not use as much due to low light setup in the dark where it did not work at all (read on).
- 5d IV – backup body which I used for two thirds of all shots
- 100-400 zoom which many of my most creative shots originated. It’s a keeper for landscape and often used at 400. I was really glad I left my 70-200 at home.
- 1.4x teleconverter and my favourite shot was at 560mm on the 100-400.
- 11-24 used and highly creative yet with disappointing edge quality.
- 24-70 f2.8 my old standby that did not let me down but its a bit heavy and didn’t take great panos because I didn’t bring the pano rail.
- 17 Tilt Shift – used sometime when I had the time. It slows me down, sometimes thats good.
- two cable releases (one of which broke and caused endless grief). If a Canon will not focus, will not shoot or appears dead, pull the cable release out – that resets the camera and fixed it. Still, I was glad I had them, 2 second timer seems too fiddly.
- my think tank street walker is the perfect pack for international travel
What I wish I had brought and didn’t:
- Rail for panos – dammit I wish I had taken it.
- 16-35 F4 which I don’t own
So here are my conclusions for Landscape/still photography:
- My current Canon 5d IV works well enough. In theory it’s not as good as a D850 or Sony A7RIII but I could not see the difference in the final results posted from the various photographers (however the images were not at 100% but then I am not sure that matters since most shots aren’t viewed/judged at 100%). 5d IV has lower megapixel but for me I at least know how to overcome its weaknesses. HDR, manual focus stack are required using bodies from all 3 manufacturers. My Canon 17 Tilt Shift produces results better than regular lenses and I might add 16-35 F4 to my kit as other photographers produced images with it that my current system really can’t.
- I bracketed everything -2,0,+2. and focus stacked key images. This was essential but created 4500 files for 1300 images. Of the 38 images I consider “distinguished” only 3 were produced on the 50 meg 5DSR the rest were on the 5dIV. Part of the reason is the 5dsr won’t focus in the dark and surprising the 5d IV did. This allowed me to set up sunrise shots using Live View. I also could focus stack by touching the back of the 5d IV screen but gave up 20 MB of resolution over the 5dsr.
- So really nothings going to change for this year. If I was starting out I would go with Sony, but I have too much of an investment with Canon.
The following is the first portion of the this article I produced when the Canon R came out in Sept 2018.
Sept. 10 2018
I have decided not to purchase the first version of the Canon R series body as it doesn’t seem to be enough of an improvement over the image quality of the canon cameras I already own such as 5D IV, 5DSR or 1dx II. Here’s why:
- dynamic range has not improved (still well behind Nikon by 2 EV, 1EV less than Sony)
- size and weight not significantly improved – may be worse as new lenses are heavy/bulky yet faster with presumably better image quality
- most likely poorer battery life as the “live view” is running all of the time (sensor always active in mirrorless)
- Ease of Use. Although everyone who picks it up says it feels great, Canon has significantly changed the button layout – why would I bother learning something new with so few benefits and the above drawbacks.
- No pixel shift for high res landscape
Benefits
- Image quality may be better in camera as it dynamically(on the fly) adjusts for CA (fringing) and vignetting yet I can do that in post with Lightroom. So not sure its really better – will have to see.
- Drop in filter mount for my existing lenses which would be nice (but not for the new ones)
- Low light auto focus – but I don’t need that (turns out I do even for Landscape – so I was wrong on that one)
- Eye focus (with firmware update coming soon) which I would rarely use although portrait photographers would appreciate it
- Newer lens lineup – sharper and faster
- Video is better – but I don’t do much of that although I would like to
- The new lens mount allows for the future development of many new lenses with capabilities we have never seen – this was a wise move (also made by Nikon). The improved communication between the new lenses and new R body will allow many improvements today and well into the future. One example is low light auto focus which opens the aperture to full (say F2), autofocuses then closes the aperture to what you set it to (say F8). Result is superior AF with the new lenses. I don’t think the old lenses work that way.
So Canon has positioned this version of the “R” camera as a mid range, mid priced , mid quality camera – similar to the 5d IV which I already own (in some ways a bit better, in many ways a bit worse). For me, EOS R would be a landscape type of camera that wouldn’t live up to the 5dSR (in terms of resolution, which I already own and understand). It doesn’t compete with the Canon 1 DX (top of range – which I already own) so its not worth comparing it to a an action camera (in my case wildlife) since it simply isn’t an action camera by any measurement (slow frame rate, slow focus).
So no benefit purchasing for me at least not now. Version two perhaps.
An Orton effect causes the lighter part of the image to glow while keeping the dark parts untouched. There are several approaches, a non-destructive method using Luminosity Masks and Smart Objects and there is also the Fast and Dirty method documented further down this post.
As most of my edit is ‘non-destructive’ so using Smart Objects seems to me to be the way to go.
Non Destructive
- Open the file from LR as a Smart Object into PS.
- In PS right click the layer just created from LR and select New Smart Object Via Copy (this will break the link to the original SO so that CR edits are still possible on the original SM from LR.
- Rename the new layer as BASE
- Cmd+J to duplicate this layer (which will keep the link to the BASE Layer.
- Rename this new layer as BLUR
- Double click the BLUR layer and add about 1 EV of Exposure so that the highlights glow but are not burned out. (this will change the BASE layer as well)
- Change the BLUR layer to blend mode of Multiply
- Add a Gaussian Blur to the BLUR layer – zoom to at least 100% and avoid bleeding the colour into the highlights. The preview window helps to avoid the bleeding while the final results are displayed.
- Add a Shadow Luminosity Mask to the BLUR layer to protect the darks as they are not part of the Orton effect.
- Optionally mask the highlights somewhat to restore detail to them (without the blur)
Fast and Dirty
Have you ever wondered how some of the top landscape photographers achieve that dreamy yet sharp look? It’s actually quite simple. In this article you will find a step-by-step guide to creating, refining and using the ‘Orton layer’ in your post processing workflow.
Take original image, add 1 stop EV.
Duplicate, 20 pixel Gaussian Blur. 2% increase is size to ‘un-register’ may be performed if desired.
Red and Yellow content works well.
Blend mode Multiply
Sharpen the original image not the orton layer
Source: Go with the glow: How to effectively use Orton Layers in post processing
I have customized my default processing settings for Lightroom in order to apply both Enable Profile Corrections and Remove Chromatic Aberration on import. To do this, I selected a raw image, moved to the Develop module, and clicked the Reset button to remove any previous edits made to the file. Then, I checked both the…
Source: Customizing the Default Setting for ACR and Lightroom
In Jan 2016, I started testing Canon’s Digital Lens Optimizer (DFO) which unfortunately can only be activated with Canons Digital Photo Professional (DPP) software – Canons simple camera raw processor – Canons much simpler variation of Lightroom.
DFO is designed to remove digital colour noise (especially at low aperture numbers such as F2.8) , correct vignetting (darkened corners), prevent diffraction at high aperture numbers (greater than 16) and remove colour noise at high ISOs for modern Canon EOS bodies with quality lenses. As of 2015 almost all of their professional “L” lenses have DFO profiles.
Canon states that with DFO, diffraction is almost eliminated at high aperture settings, so far I have not had a chance to complete the diffraction testing. I did test complete various tests with different apertures at low and high ISOs and found that the diffraction levels in my studio setting were the same with and without DFO (close target to camera setup). I need to verify other distances in the field before making a final judgment on diffraction.
Since LR could not pick up DFO settings, I was forced to use Canons DPP software. The major finding out of all of this was that Digital Photo Professional (DPP version 4) reduced colour noise much better than LR 6 CC and sharpens much better as well.
I started testing DFO with DPP and here are my findings to date:
- Loading the Digital Lens Optimizer files to the camera and turning on DFO under Red 1 Menu (lens aberration correction) settings has little noise impact for high quality lenses at any ISO that I could see. Regardless – Lightroom does not pick up the DFO settings in the camera and DFO has no impact on any Lightroom-only processed images.
- While DFO had little impact, (high quality lenses and bodies) DPP did have a major benefit over LR noise reduction and sharpening – especially at high ISO (6400 on 5DSr body). The results are quite significant at reducing chromatic colour noise and luminance noise, at high ISO levels.
- A further finding is that Canons DPP sharpening seems far cleaner than Adobe’s LR. LR has a tendency to “fluff the pixels” while Canons seems cleaner.
- Using DPP mucks up my workflow quite considerably since I would have to include DPP before processing in LR. I don’t find DPP easy enough to work with to replace LR, however it is quite fast and pleasant to use for tethered photography.
I plan on doing more testing (perhaps using DPP Batch processing) to import from the camera, make basic noise and sharpening corrections and exporting into LR.