

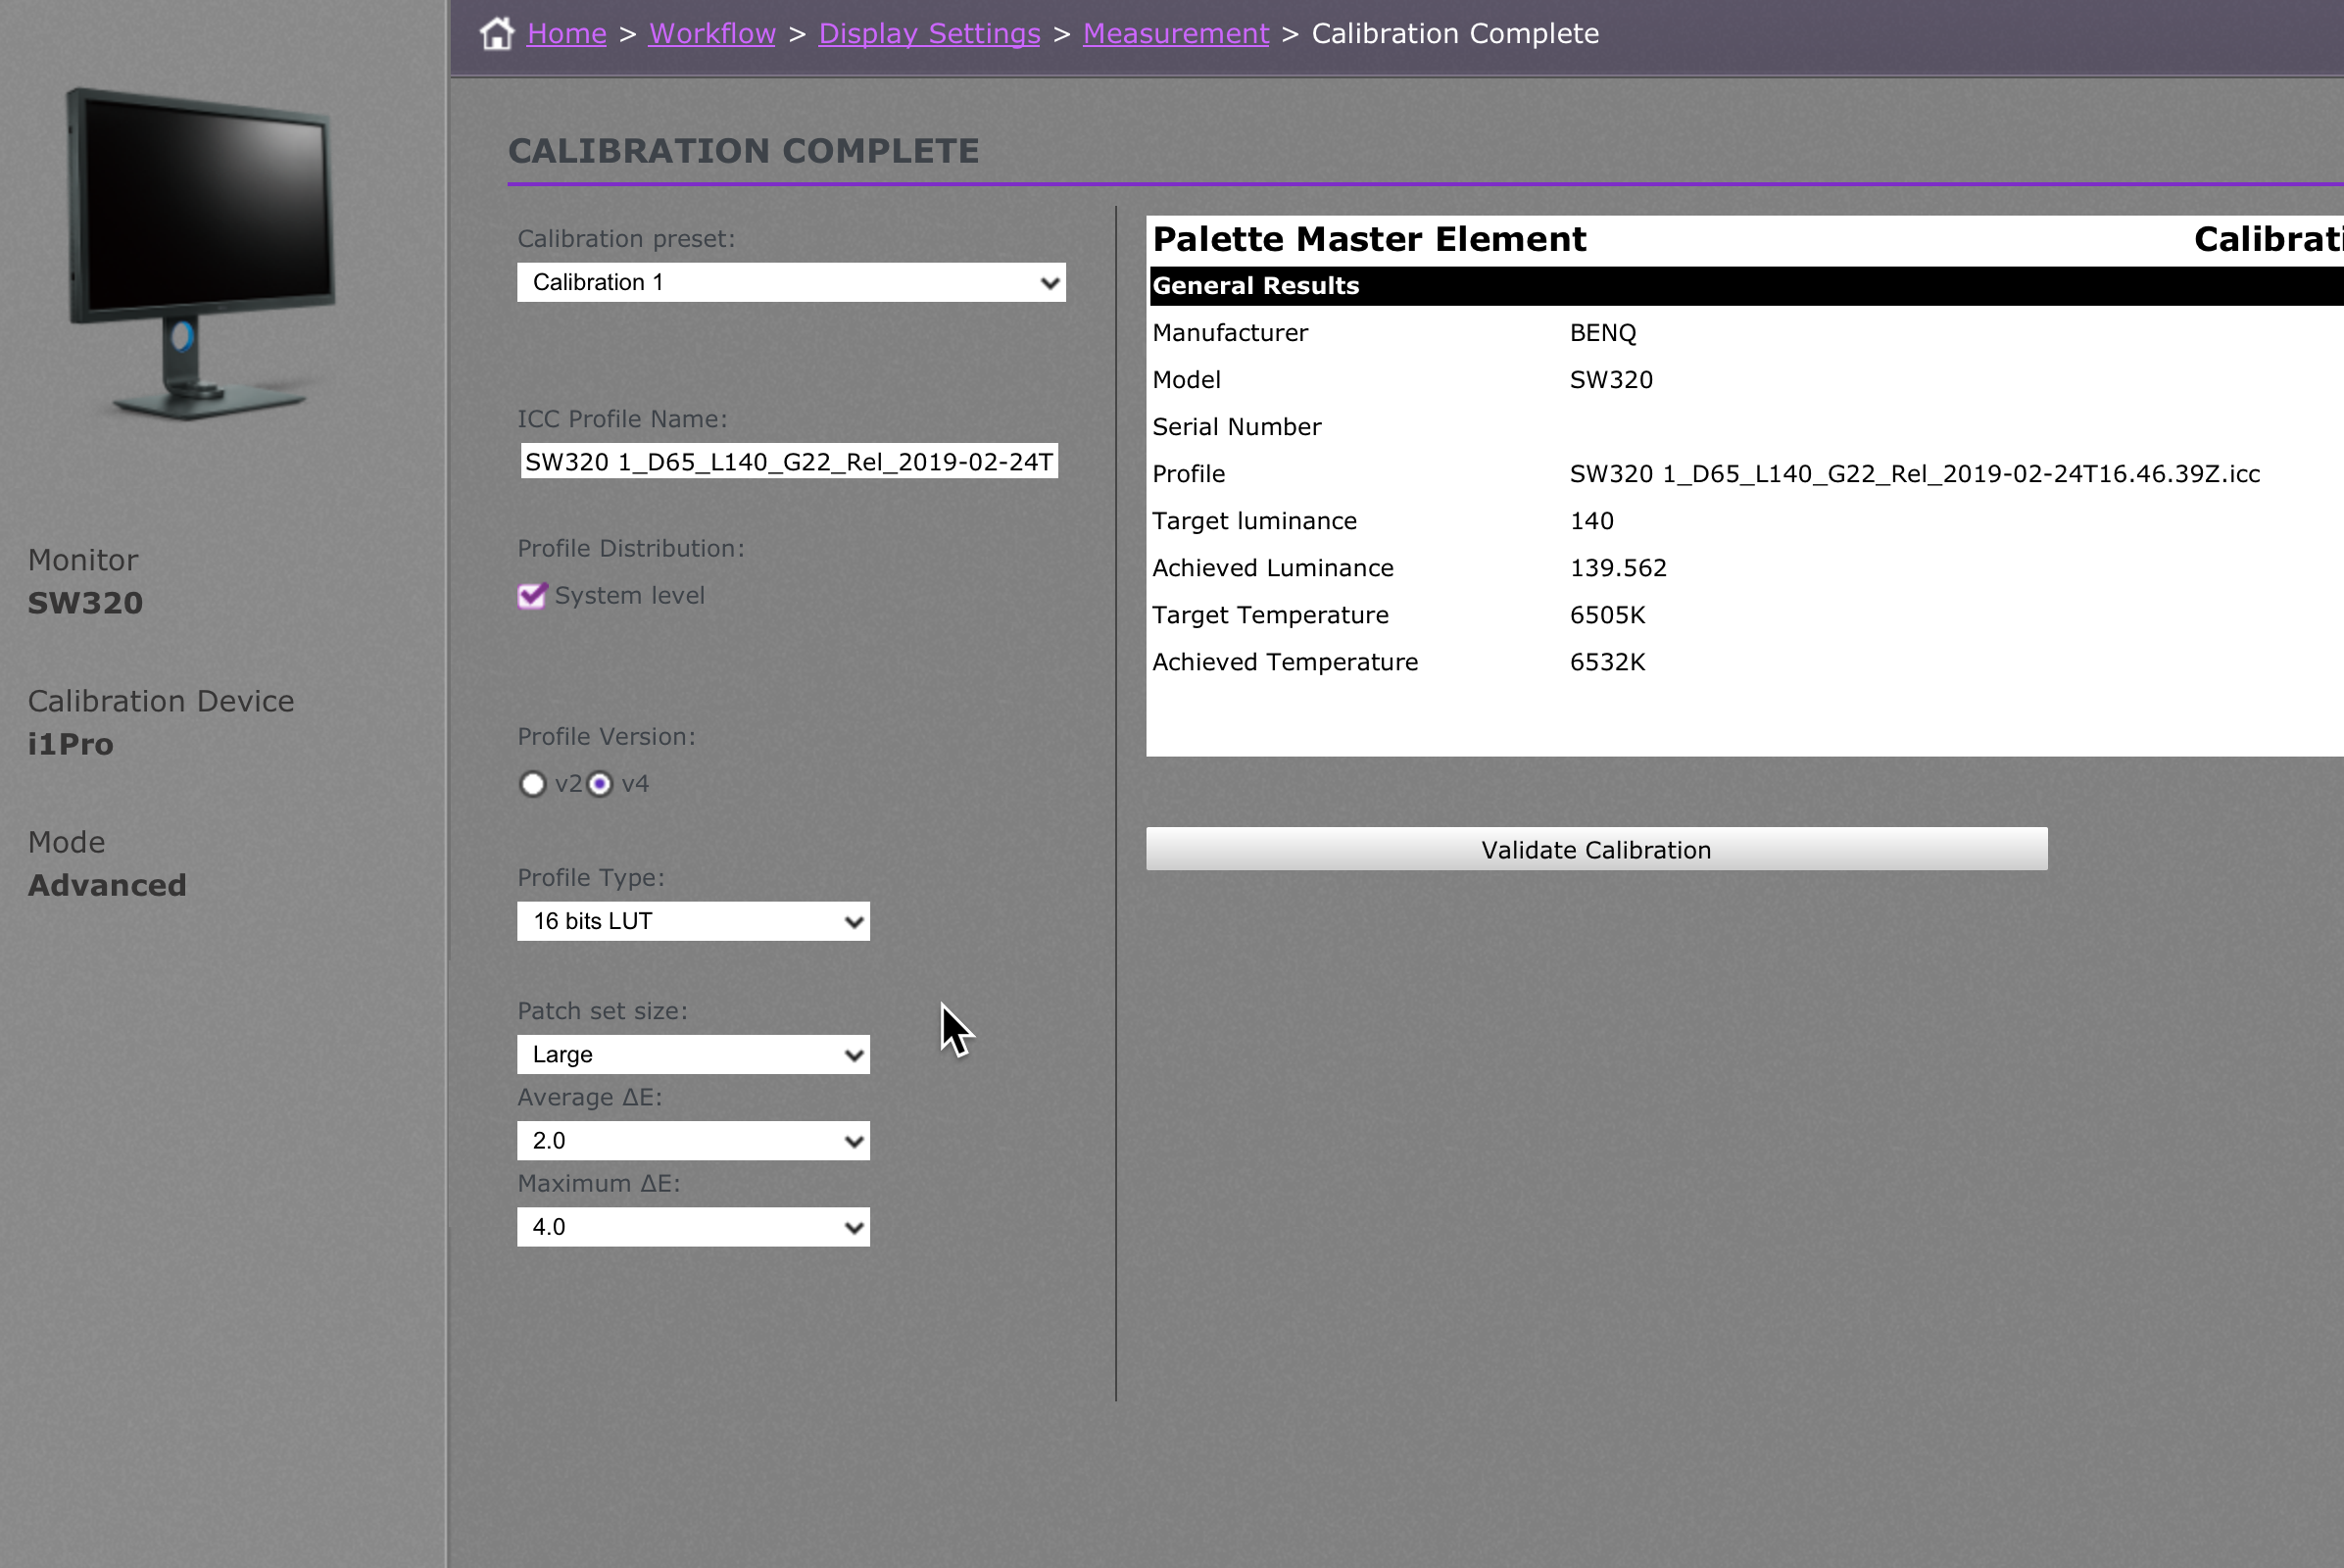
Note: If it asks to download the latest software, be aware that when the update installation process starts, it looks hung, there is a button at the bottom right that you have to press to ‘continue’ however the button text is almost invisible. Also ensure the Monitor is using the correct calibration preset – in the following examples I left it at Calibration 1 – next time rename it.
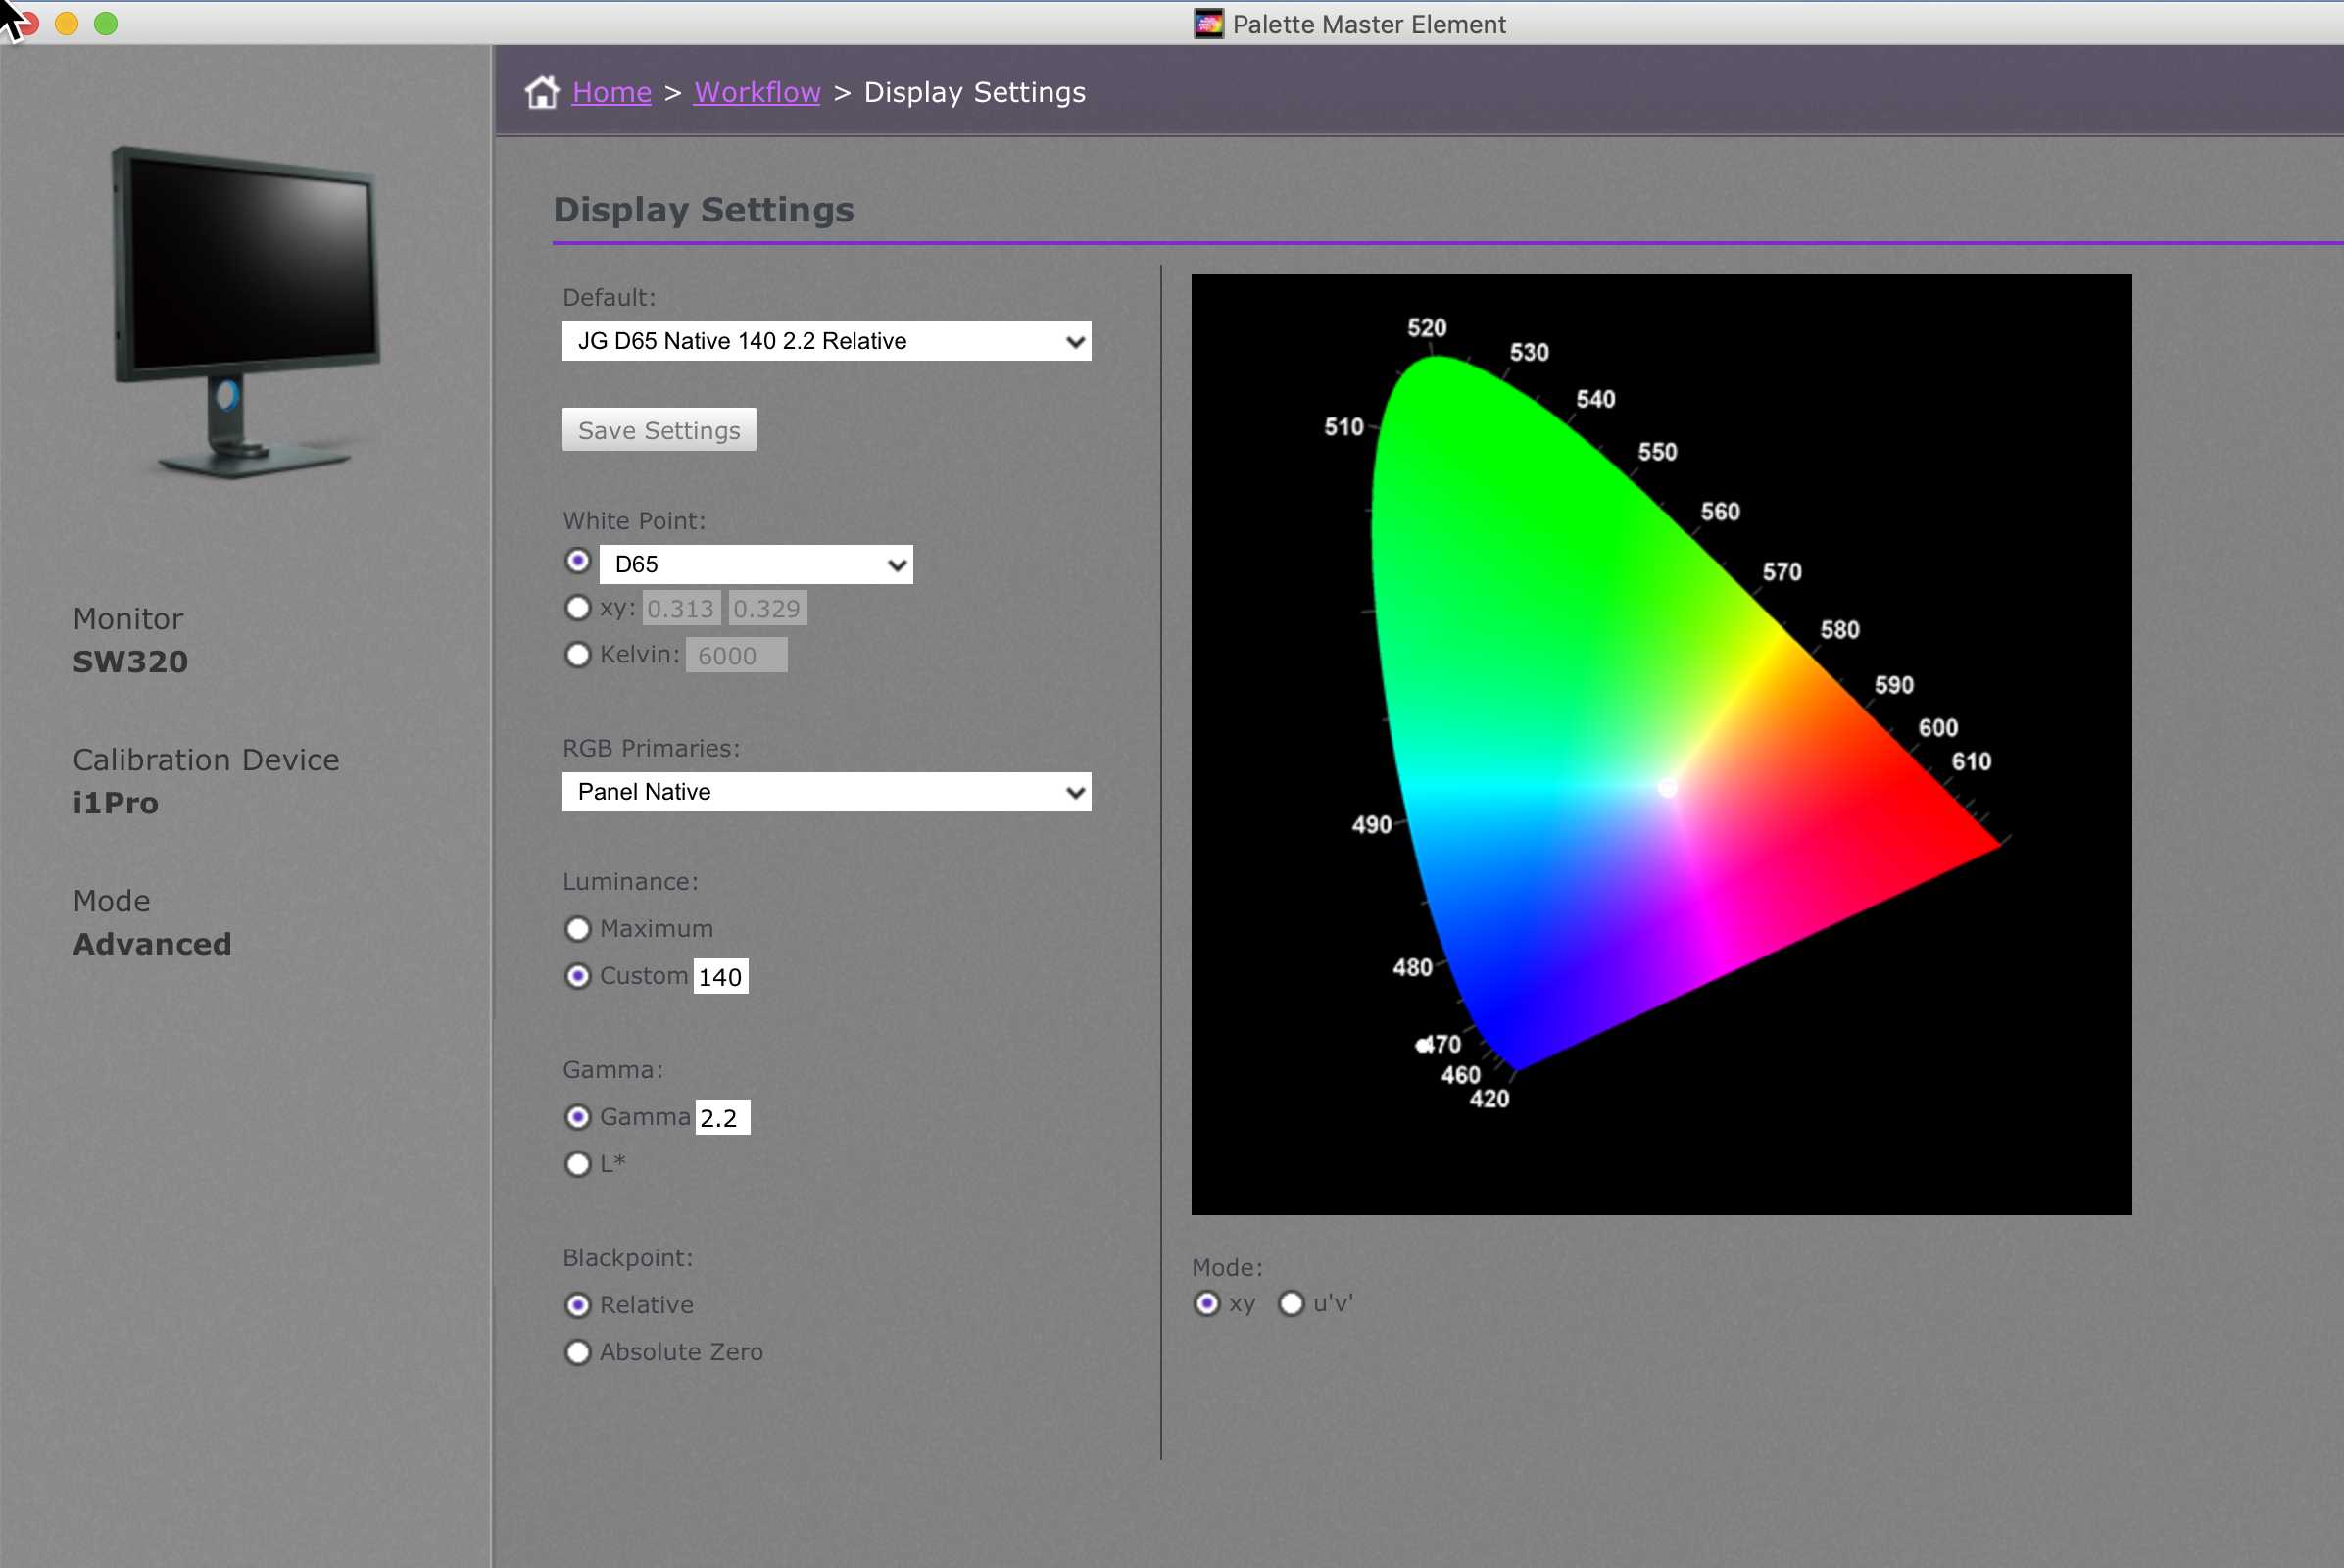
Monitor: SW320
Calibration software 1.3.4 now working with I1Pro. Plug the monitor directly into the USB port on the back of the iMac and the i1Pro into the monitor.
Calibration Unit: I1Pro
Gamma 2.2
Panel: Native
Black Point:Relative
Profile Type: 16 Bits LUT
Light:D65
Luminance: 140
Patch: Large
- Set camera to Aperture Mode
- ISO 100
- Manual Focus
- Highest Aperture Number on lens – F16 or larger number
- Photograph Monitor with a white screen (say blank word document) so that the monitor is out of focus, only dust will then be visible
- Examine image – preferably by importing into LR
Use the info panel and move the cursor to the desired location of the flare. Note the x,y coordinates. Create a new layer filled with black (Option Delete), Filter>Render>Lens Flair>Movie Prime and then Option Click on the preview window and enter the x,y coordinates. Then change the blend mode to Screen.
After recovering as much detail as possible in LR, PS will be required to complete the process for any blown highlights. The objective is to pull grab on to even the slightest bit of contrast within the blown highlight and increase it – which by definition is to make the greys darker.
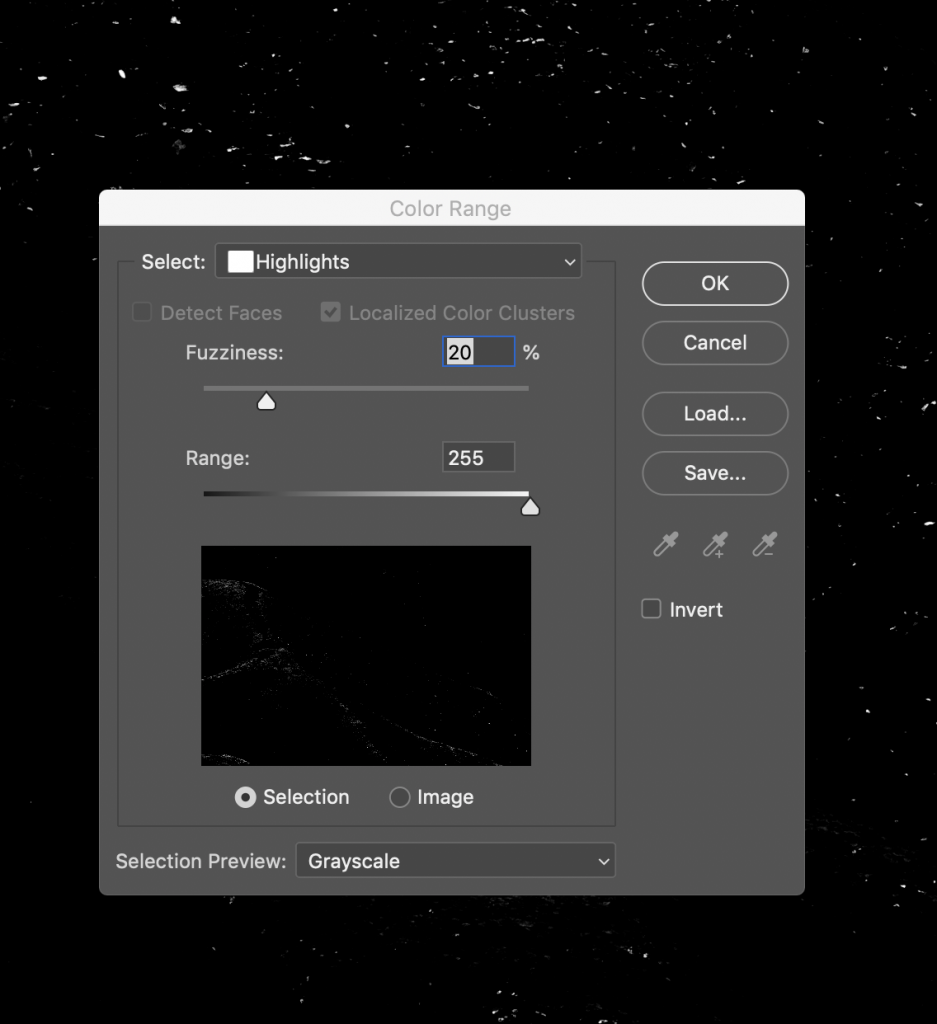
First create a detailed Luminosity Mask selecting only the blown highlights. This is best accomplished by using Select > Color Range > Highlights then setting the fuzziness to select just the desired highlights. Turning on Grayscale may assist in the selection. Range should be set to 255 or as required for the specific image.
Create a Mask from the selection on a Levels Layer with a blend mode of Luminosity (to avoid changes to the colour).
Zoom way in to a blown highlight (2000-6000 %). It it the big blob in the example below to the right . Notice that is it not actually totally white – it has some detail which is not visible at 100%. Use a Levels adjustment to compress the dynamic range of the highlights – in this sample 156,1,255 with whites limited to 242. White output varies but would at least be something less than 250 – what ever is required to visualize the contrast in the whites.
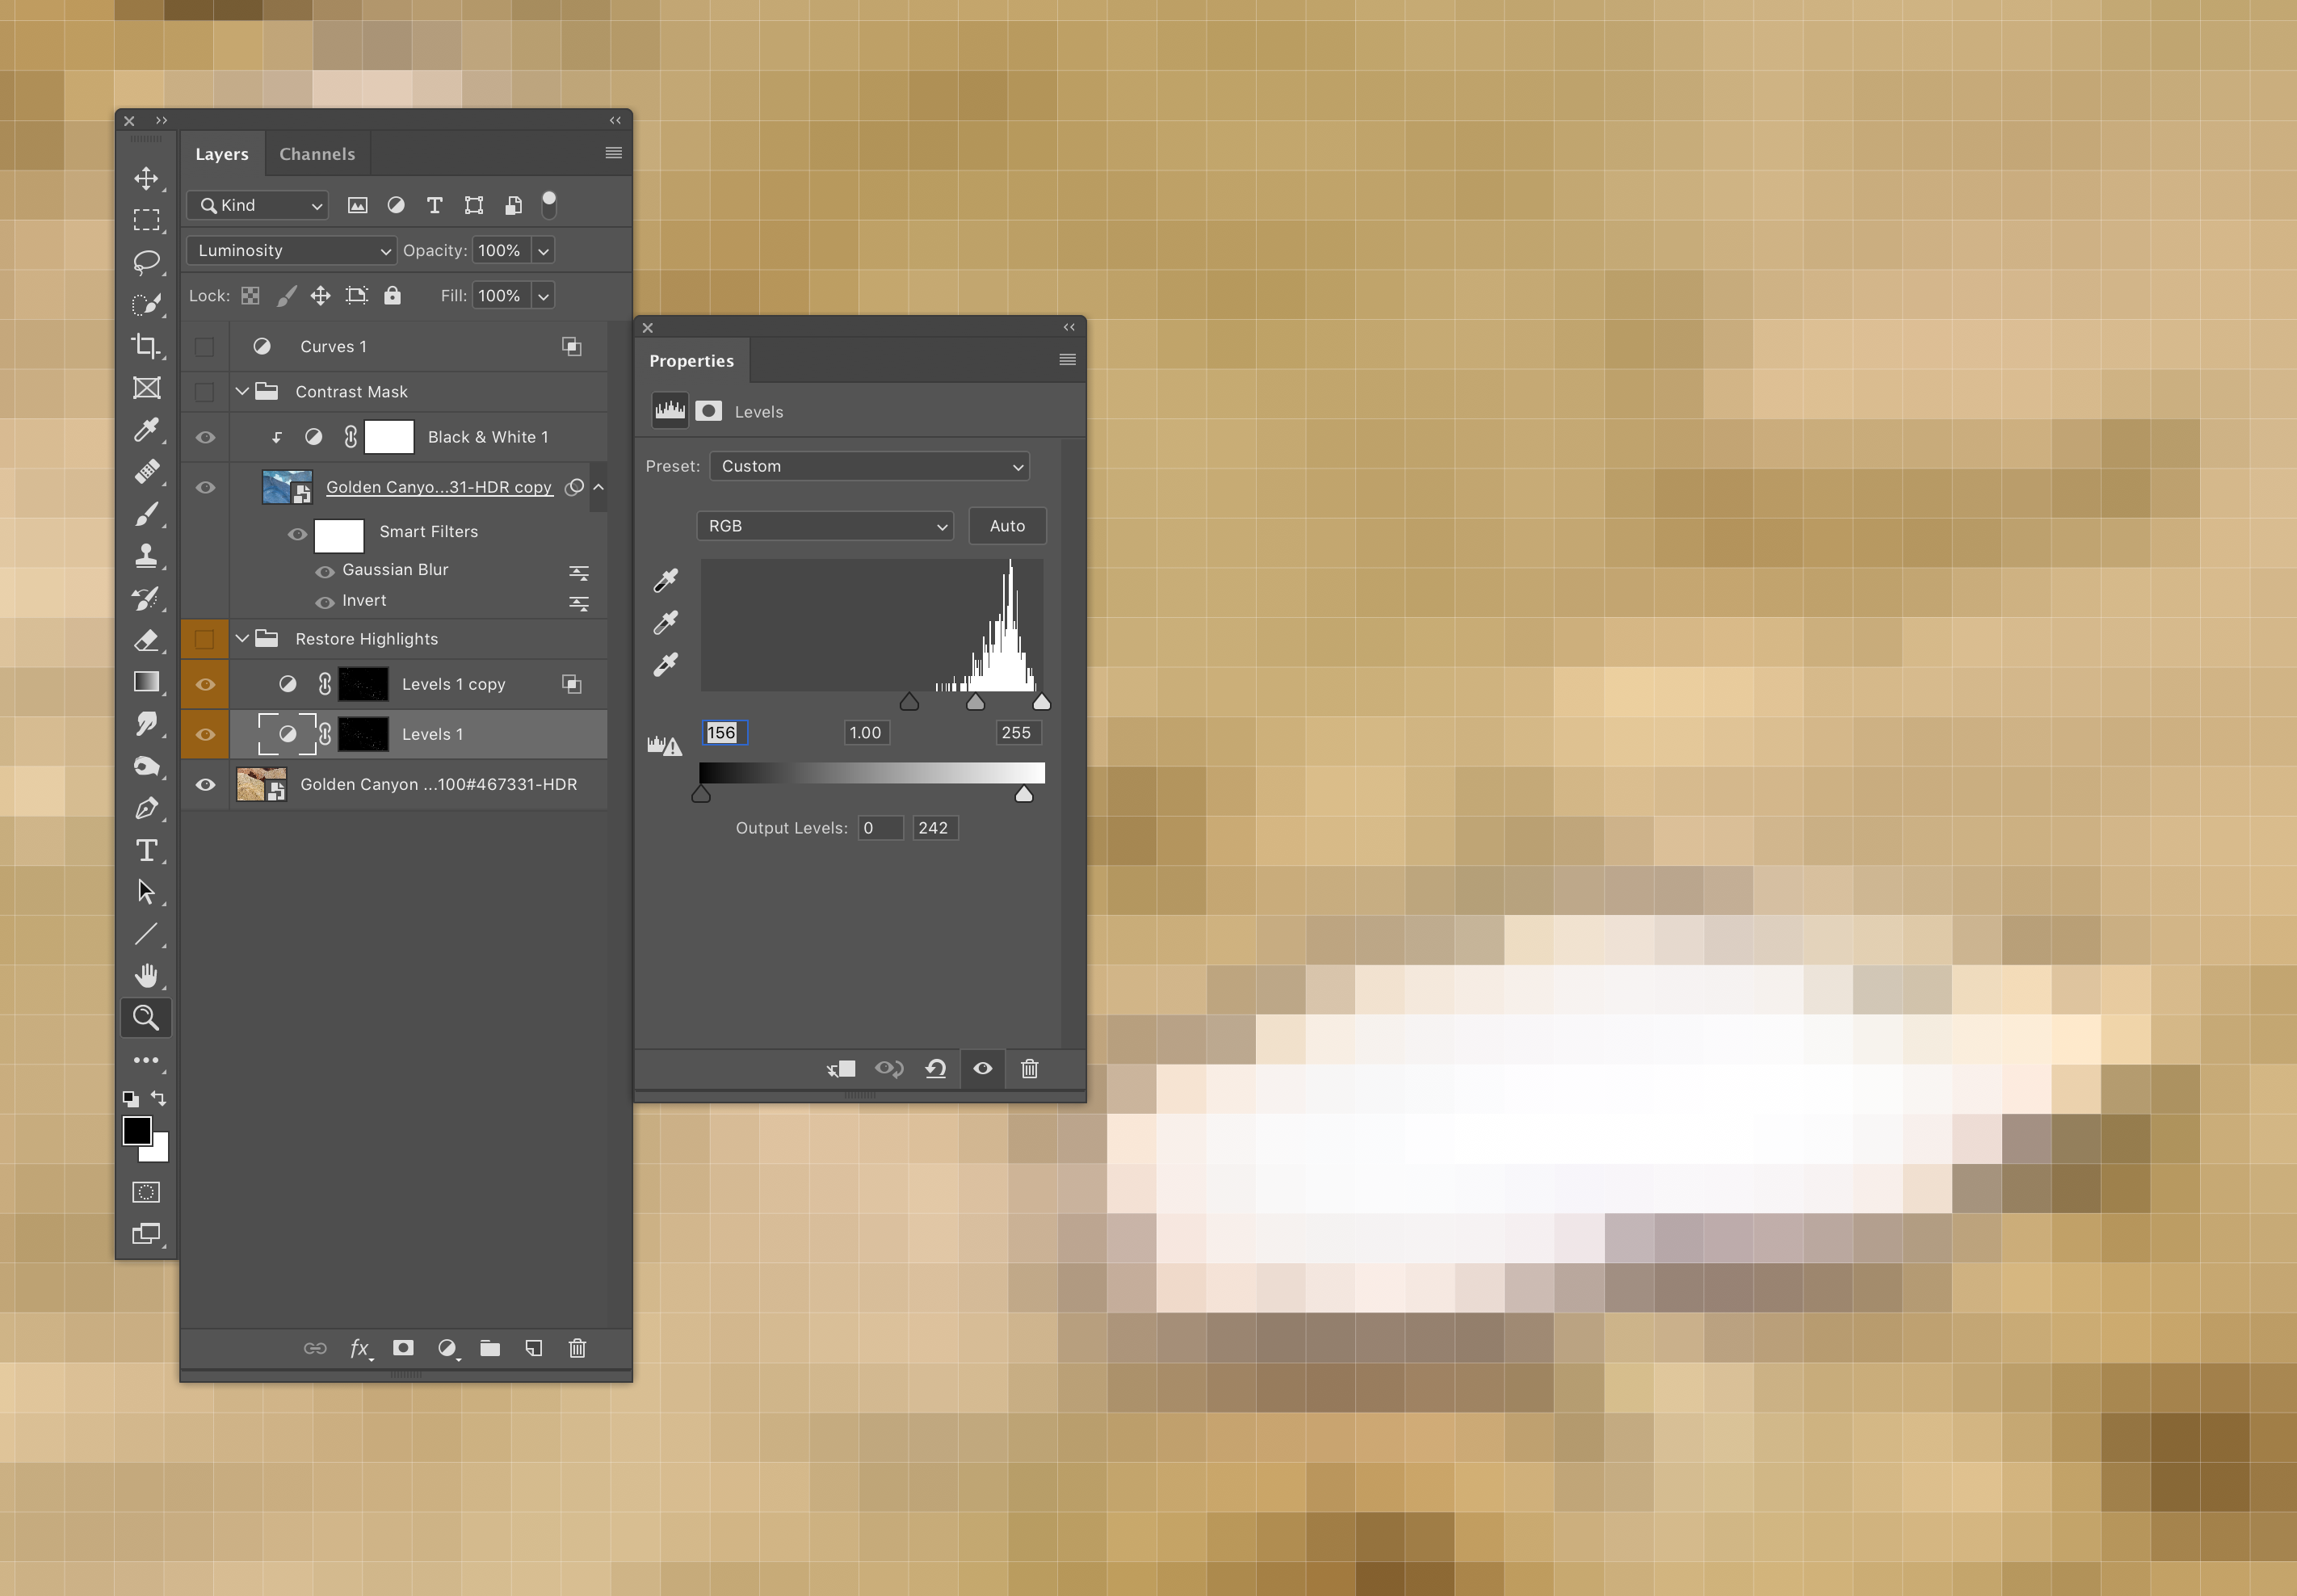
Duplicating the Levels adjustment allows more refinement (also with Luminosity Blend Mode). Use blend-if (double click the empty space on the levels layer) and move the black point to increase the contrast. Feather the whites as necessary trying to pull the detail out of the white blob.
The final result is below. I placed the two level adjustments into a group which would allow the opacity to be changed (3 orange layers).

These steps create a luminosity mask protecting the shadows:
- Open the Channels Panel in PS
- CMD+Shift+Click the RGB Channel which selects the brights.
- CMD+Shift+Click the RGB Channel again and more darker areas are selected (leaving only the shadows)
- Cmd+Option+Shift+Click selects only highlights
- Cmd+delete key fills the selection with Option+delete (FG/BG) or Shift+delete key for fill options.
- Command/control click the first mask in the Layers panel to load it as a selection (Cmd click on a Mac)
- Command/Control Shift click the second mask in the Layers panel to add to the existing selection (Cmd Sh click on a Mac)
(At this point you will see marching ants around both selections. Don’t deselect.) - Layer > Layer Mask > Delete
- Layer > Layer Mask > Reveal Selection
Copied from: https://appleinsider.com/articles/19/01/15/how-to-make-new-t2-secured-macs-boot-from-external-drives
Apple’s security processor gets in the way when you’re trying to use external drives to boot from. Fix this now because if you wait until you need to restart from one, you’ll have problems.
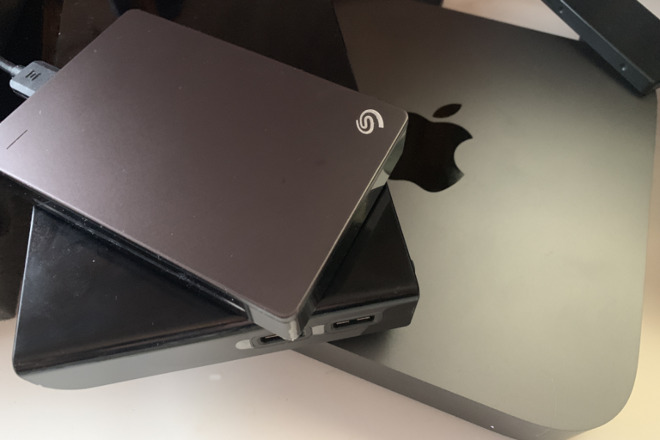
A bundle of external drives atop a Mac mini
The T2 chip that Apple has been adding to new Macs does many things to help your computer be more secure —but one of them is an issue. By default, Macs with the T2 processor will not boot from an external drive. That’s fine, that’s even good, but it’s an inconvenience when you want to do it. Then if the reason you want to boot from an external drive is a catastrophic failure of your internal one, it’s a problem.
Apple doesn’t see it like that. The company believes we all have great online connections all the time and so the official advice would be to boot from the recovery partition over the internet. Even if you can definitely do that, it’s a help for troubleshooting problems. If what you really need is to carry on working, then you will have created a clone of your troublesome drive yet will not be able to boot from it.
Then just to double down on how this good security system can also be a pain, there’s the issue of the keyboard. To convince your Mac to boot from an external drive, you have to first restart into macOS Recovery and that requires you to hold down Command-R as the machine boots. Only, if you have a wireless keyboard, the restarting Mac may not recognize it.
Truly, if you’re booting from an external then it’s to solve some problem, not to find others. So take a minute to fix this now, before you have to.
It will only get worse and also better
At time of writing, the Apple T2 Security Chip is in the iMac Pro plus models of the Mac mini, MacBook Air and MacBook Pro that were launched in 2018. You can take it for granted that it will appear in all Macs eventually.
If, for any reason, you’re not sure whether the Mac in front of you has the T2 processor, you can check through System Information. Hold down the Option key as you select the Apple menu and where you normally see About this Mac, you’ll see System Information.
Choose that and then in the window that appears, click on Controller in the left-hand list. If the Mac has a T2 chip, it will say so here.
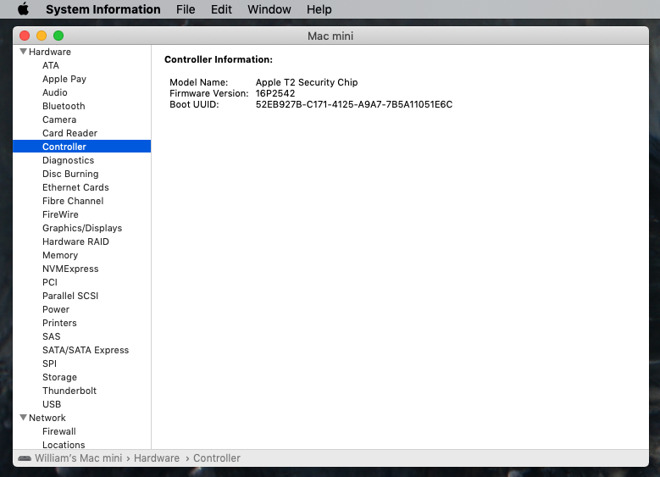
Where to confirm that you have a Mac with the Apple T2 Security Chip
If your machine has it then the default is that it will not allow you to boot from external drives. Before you go fixing that, however, take a moment to check whether anyone already has.
Plug in an external drive that you know is bootable. Go to System Preferences and Startup Disk. Click the padlock and enter your password, then try to choose that external drive to boot from.
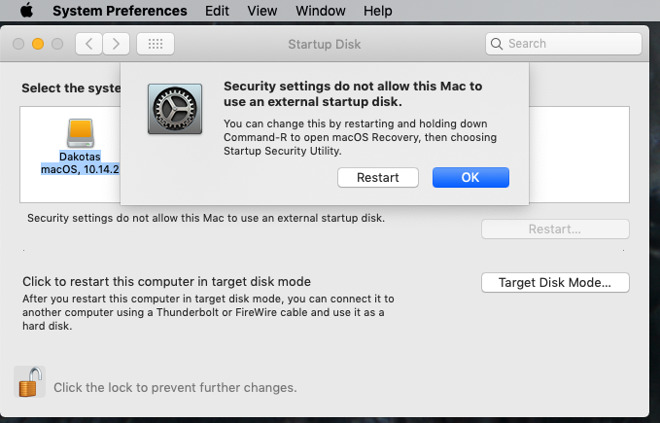
What you see if you try to boot from an external drive on a Mac with a T2 processor
You will get the same information if you’re using an app such as Carbon Copy Cloner. This utility lets you automatically create a bootable copy of your current drive so that in the event of any problems, you can simply swap straight over. Ordinarily Carbon Copy Cloner will tell you that the new cloned drive will be bootable, but with T2’s default settings, it can’t.
Instead it will show a warning triangle and when you click on that, you get the fuller explanation.
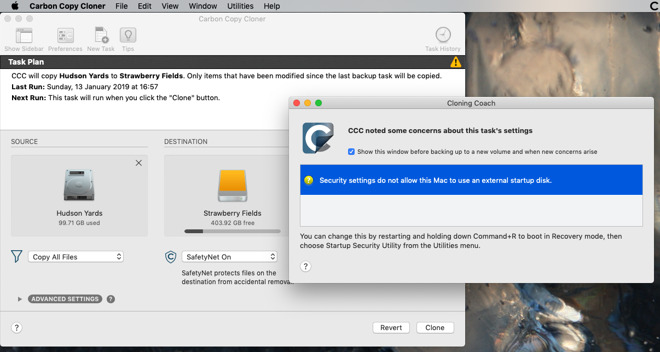
Backup software like Carbon Copy Cloner will warn you of issues too
This is particularly significant because there are other reasons why a cloned drive may not be bootable. Apps like Carbon Copy Cloner may not be able to tell you that there’s a problem because it only sees that the T2 is preventing booting. So you could be regularly creating a clone drive and only find that it doesn’t work when you need it.
So fix it
Plug in a wired keyboard. Restart the Mac and hold down the Command and R keys until you see the Apple logo.
Let go of the keys while the Mac goes through the rest of this special startup sequence. Instead of the regular desktop or login windows, it will bring you to the macOS Recover screen which lists options such as recovering from a Time Machine backup.
You don’t want any of the options on the the Recover screen. Instead, choose the Utilities menu and click on Startup Security Utility.
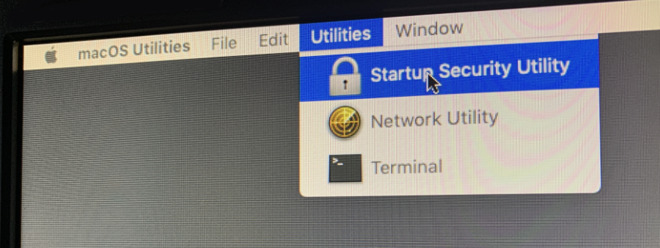
Ignore all the macOS Recovery options and instead choose Startup Security Utility
You’ll have to enter your password to launch it, but then when you do, you’re presented with three types of option to do with firmware passwords, secure boot —and lastly, External Boot.
This will be set to Disallow such booting but you can click on the button beneath to change that to Allow.
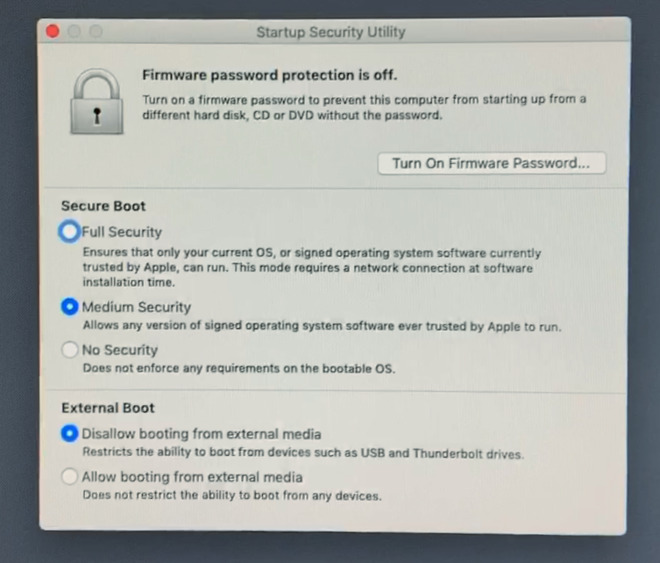
This is where you tell the T2 that you want to be able to boot from external drives
Choose Allow, then quit the utility. You’re taken back to the macOS Recovery window. Click the red close button at top left and lastly you’ll be asked about restarting.
Click on Choose Startup Disk and then pick any bootable drive you’ve got attached. The Mac will restart and it will boot from that drive.
It will now boot from any drive you connect over USB or Thunderbolt so you can keep an emergency clone ready to go at any time. Now you’ve done all this, take the time to create a backup that regularly maintains a clone of your bootable drive.
Every Year I plan to create a new LR Catalogue pointing to an empty clone of my Images Directory Structure then fill in images for eventual merging back to the master catalogue. The following Unix command will create a copy of my directory structure in /Areca-T2/LR JG Pics to Desktop/Temporary\ Stuff – just the folders not the files.
rsync -a /Volumes/Areca-T2/LR\ JG\ Pics /Users/jeffg/Desktop/Temporary\ Stuff –include \*/ –exclude \*
The Folders in Temporary Stuff can then be moved to create a new Images Folder for the year.
When using Aeroplan, I have been advised to use the kiosk and enter 0 bags, then appear at the baggage drop-off and hand them my proof of card for my plan. The AC agent should checkin the bag for free, if not ask for the manager.
Holding the Option Key on Reboot prompts for the Disk Drive to boot from, however some drives are too slow to start (such as ARECA T2 8 disk array) which takes a few minutes to fully start. Therefore its necessary after the prompt to hit (Right side of keyboard) Option+Shift and (Left side keyboard) Command +